User guide for Editor
Video tutorial
Watch the full editor walkthrough — from an empty venue list to two published schemas, an ice-hockey arena and a cabaret hall — in under nine minutes:
Introduction
Description
The Editor component of seatmap.pro allows creating, editing, and storing schemas of concert halls, stadiums, clubs, theatres, and other venues. For a hands-on walkthrough of building a realistic venue layout, see Visual Workshop: How to Build Beautiful Maps.
Schema editor features
- Quickly drawing seat rows
- Moving and deleting selected rows and seats
- Adding rows and seats to created sections
- Tilting, warping, and stretching seat rows
- Managing tables (including round and elliptical tables)
- Table editing mode for individual seat management
- Keyboard shortcuts for common actions
- Seat name conflict detection with visual warnings
- Per-row seat spacing control
- Row label alignment modes
- Events Hub for event lifecycle management
- Importing vector objects from SVG
- Linking vector objects to entry zones and seat rows
- Managing prices
- Exporting schemas to SVG
Technical requirements
To work with Editor, use the Google Chrome browser.
Quick start
Adding a venue
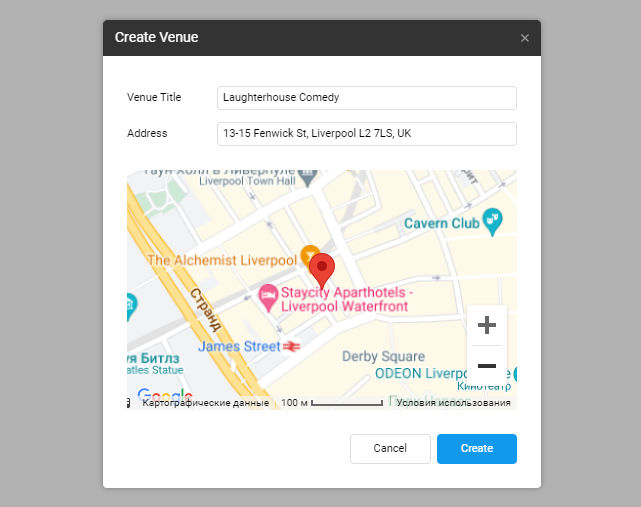
Click Create venue.

In the Create Venue window, enter the name and address of the venue. The map will be updated accordingly.
Click Create.
Creating a schema
Click the name of the required venue in the list on the left and then click New schema.
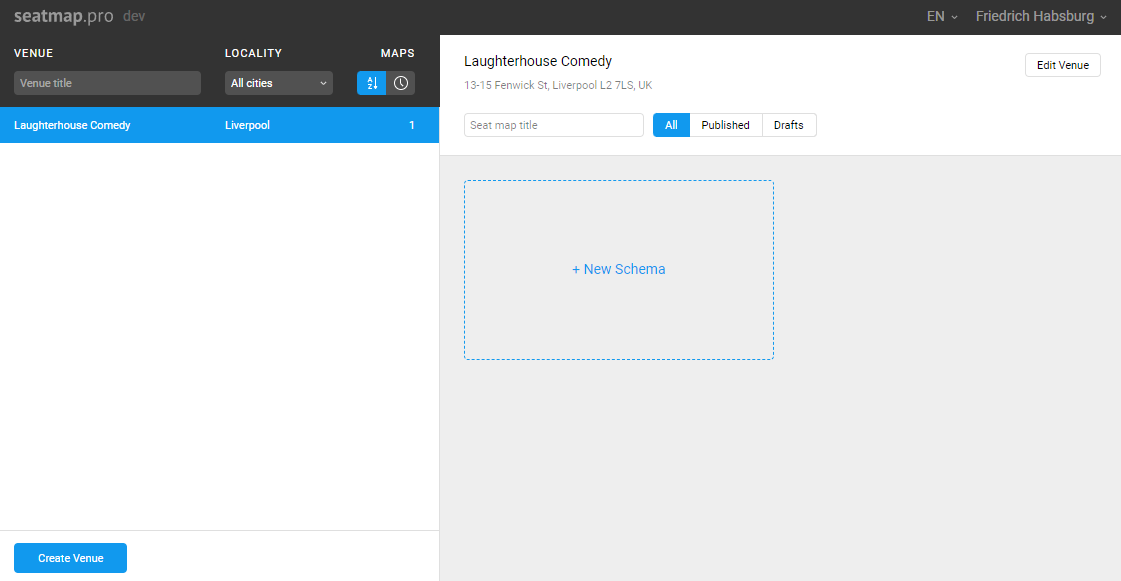
The new schema editing screen will open.
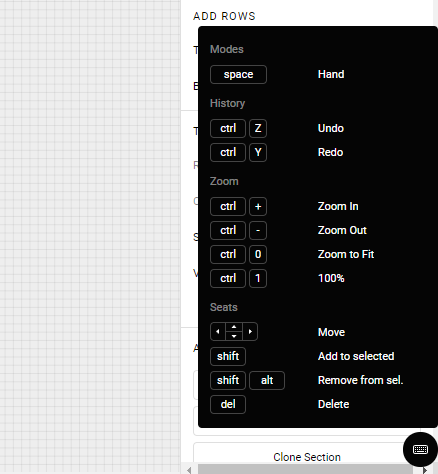
In the bottom right corner, you can see a black keyboard icon. Hover over it to see a list of useful keyboard shortcuts. For example,
Ctrl+Zreverses your the last action.
Sections and seats
Creating sections
Select the Seat Rows tool in the toolbar.
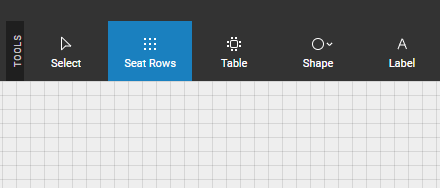
Hold down the left mouse button and drag the pointer. You will see a rectangle and a number of rows and seats that will be created after you release the mouse button.
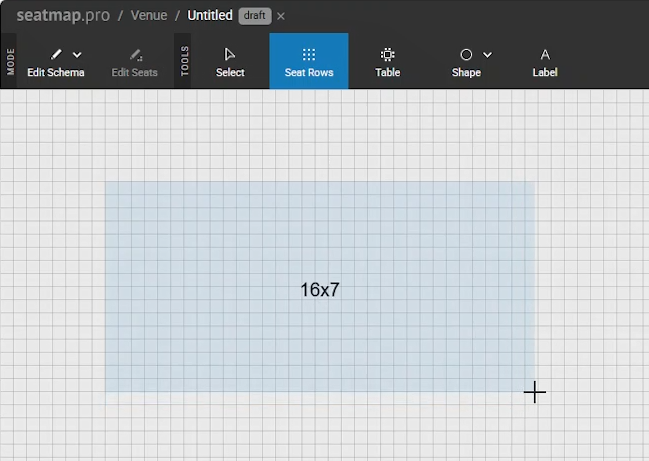
If you started drawing a section but then changed your mind, reduce the rectangular selection to a state where no number of rows and seats is displayed. Release the mouse button, the section will not be created.
If while stretching the rectangle you see that the required number of rows or seats does not fit on the screen, undo the drawing and reduce the scale of the schema as required.
After creating a section, you can move it with the mouse, rename it, or apply transformations (rotation, vertical shift, etc.) to it.
Editing a section
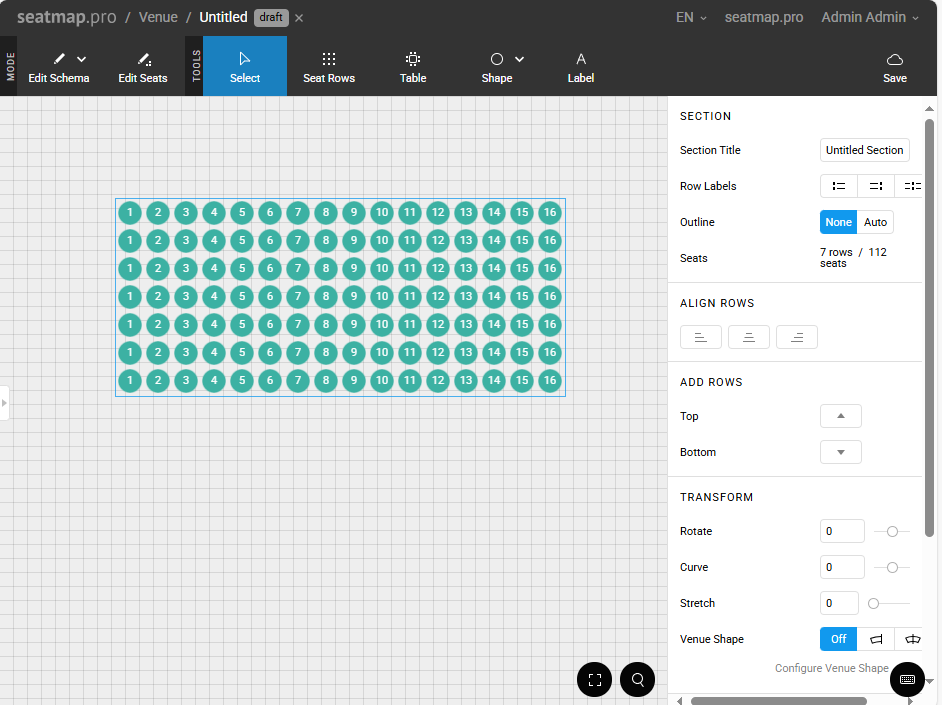
Select a section to see the sidebar. In this sidebar, you can do the following:
- rename the section
- manage row number labels
- manage outline settings
- align rows left, right, or centre
- add extra rows to the top or to the bottom
- transform the section
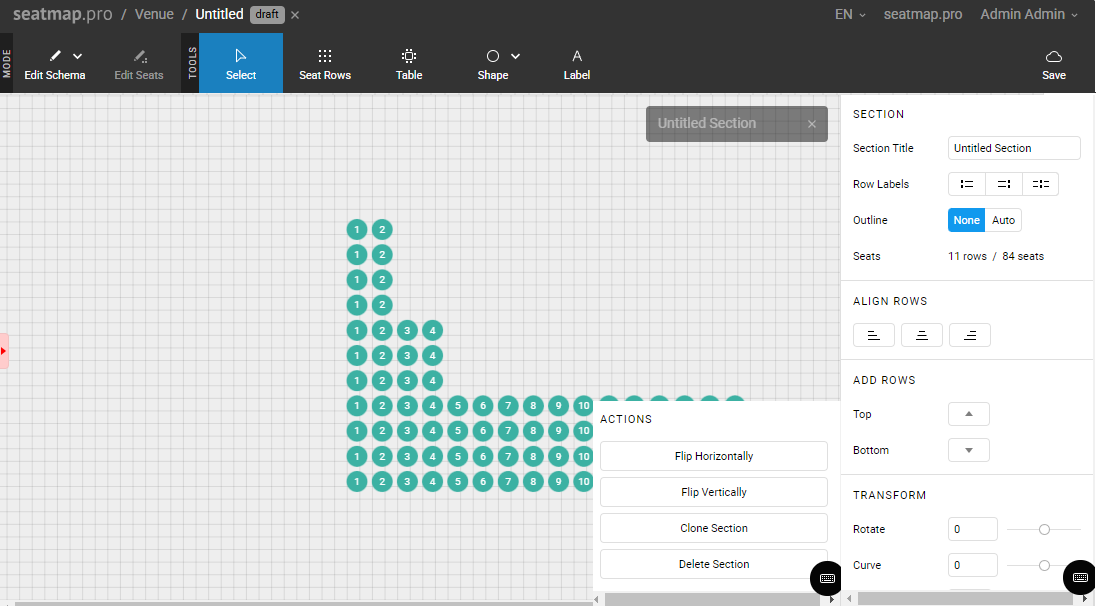
- perform basic actions (flip vertically or horizontally, clone, or delete the selected section)
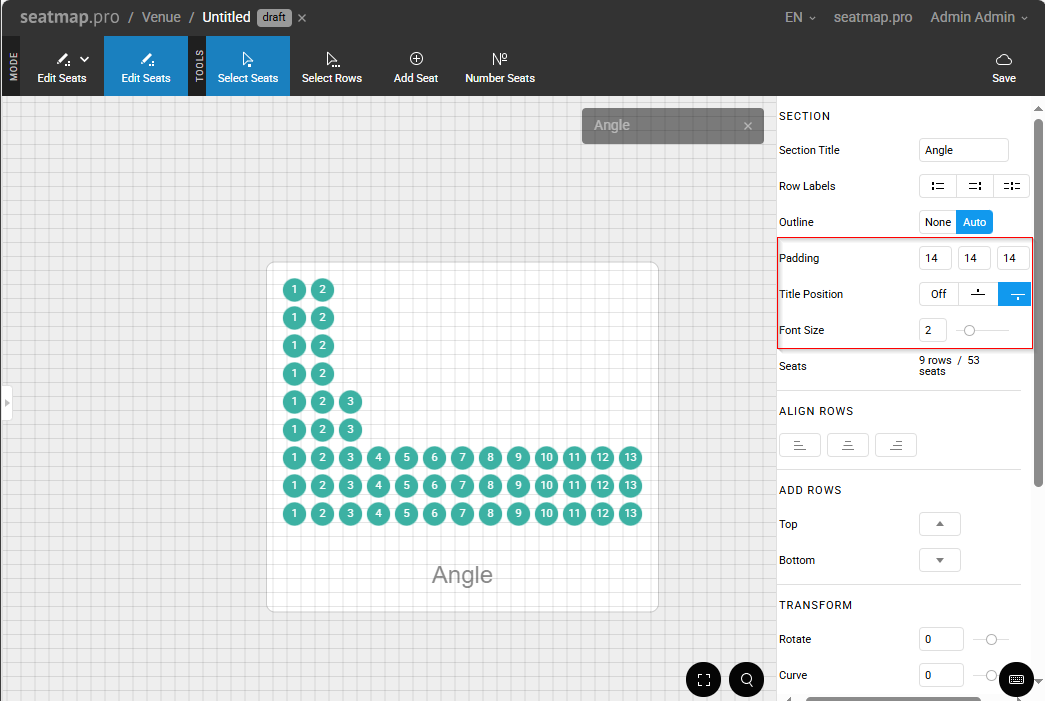
The section outline parameter is disabled by default. Enabling this parameter allows managing the size of the outlined area (padding), font size, and position of the section title.
You can also apply transformations to a section. A section can be rotated, curved, or stretched easily — simply enter the required value or use the slider on the right.
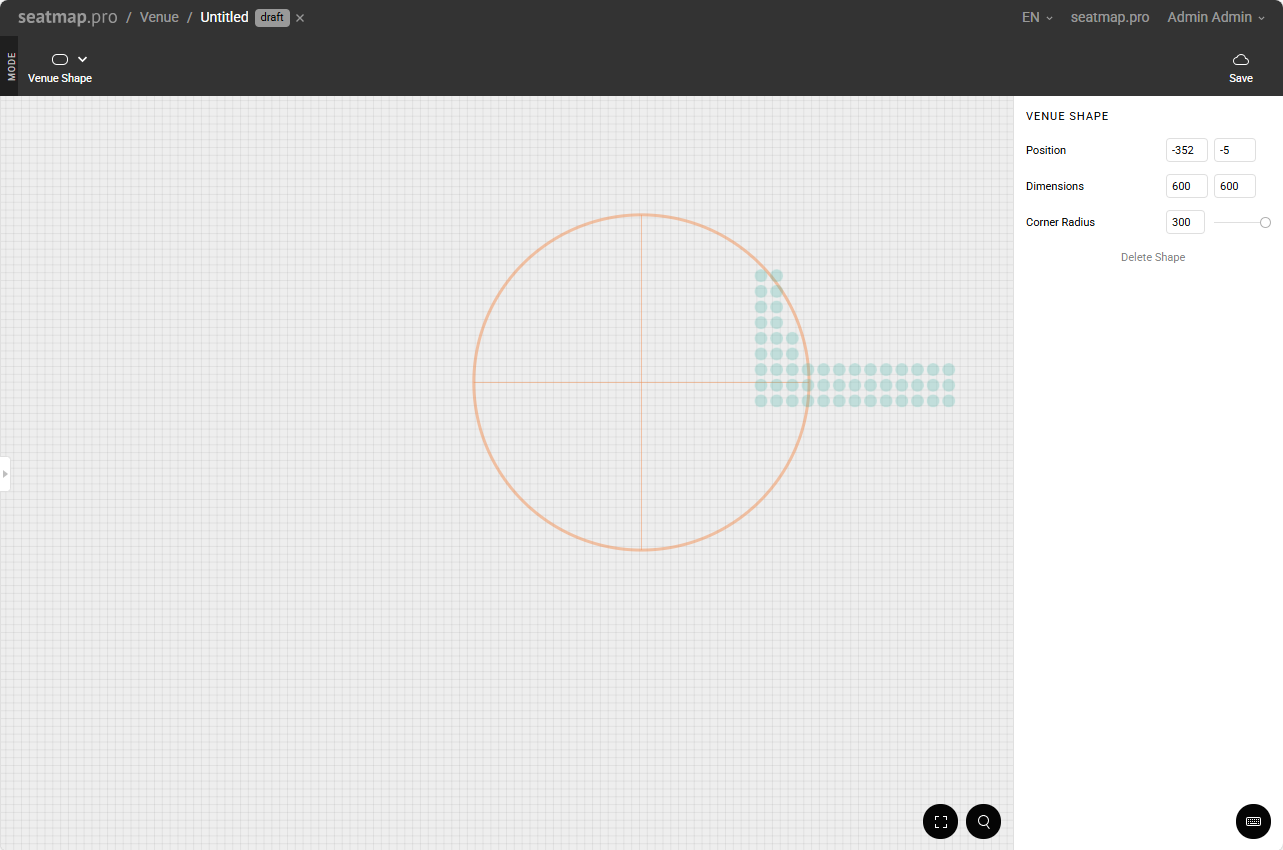
Shaping a venue and transforming a section
The shape of a venue is off by default. To enable this setting, select Venue Shape in the drop-down menu. In the sidebar that opens, click Configure Venue Shape to adjust its position, corner radius, and dimensions. You also can see the same button under other section transformation settings.
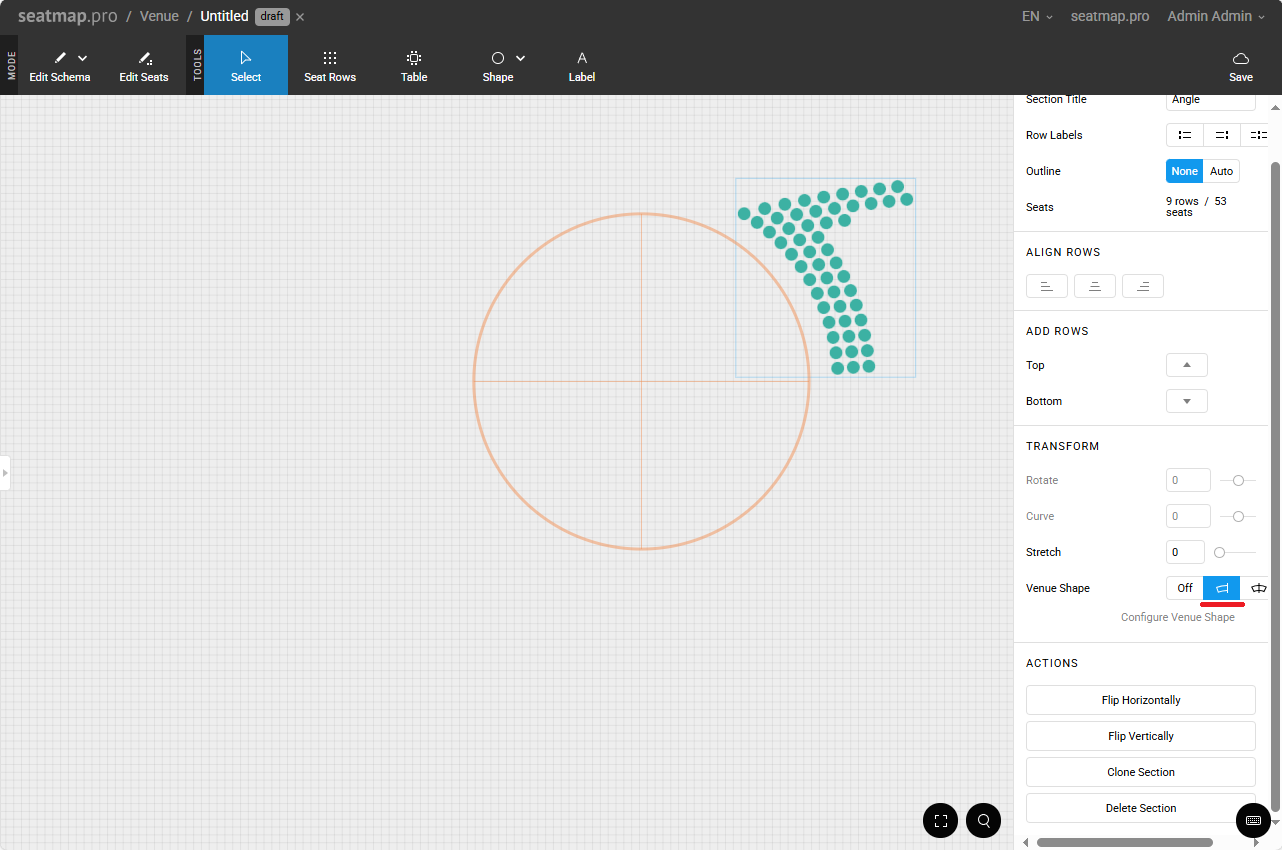
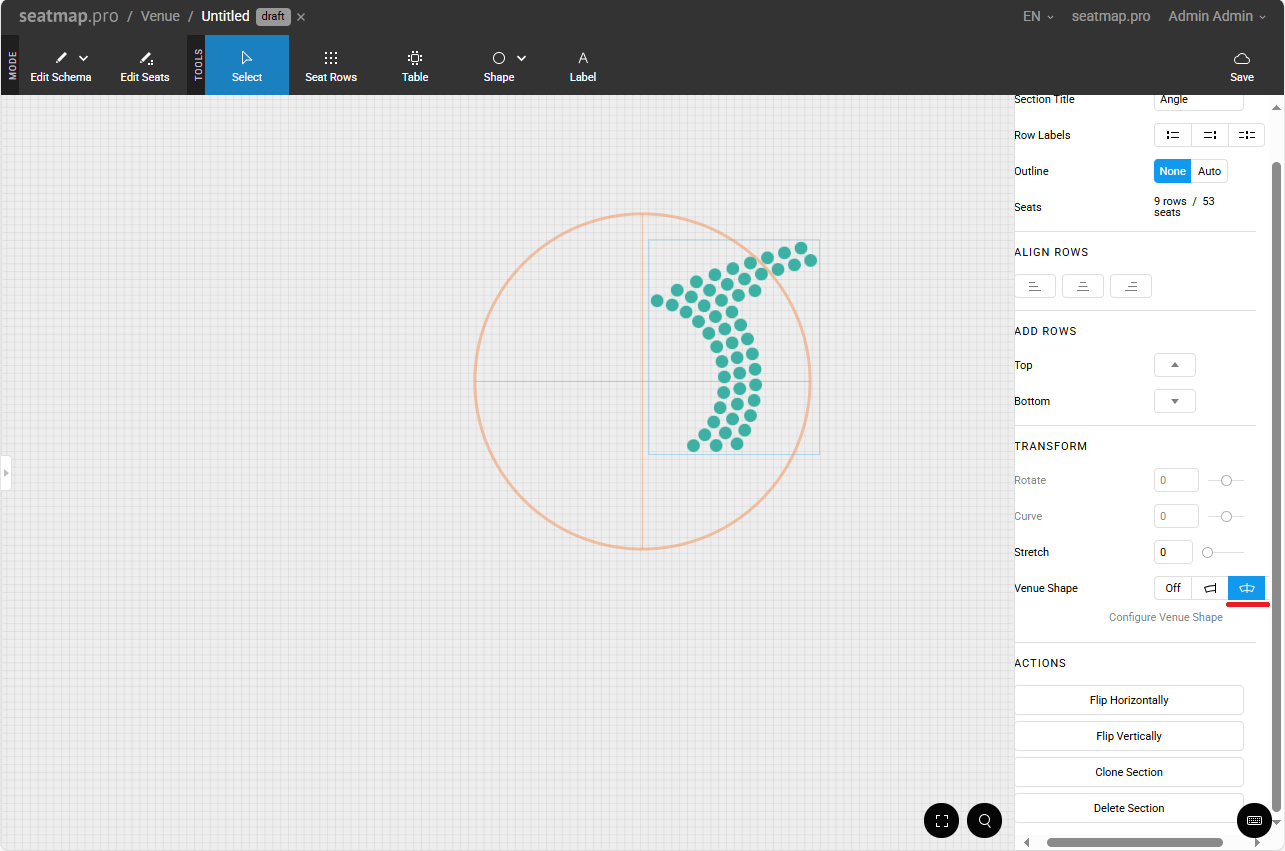
After the venue shaping is done, get back to the schema editing mode by selecting it in the toolbar. Then select a section and select one of the following options:
- leave Venue Shape disabled (which means you will have to position the section manually)
- position the section outside the venue shape
- position the section inside the venue shape
- center the section relative to the venue border
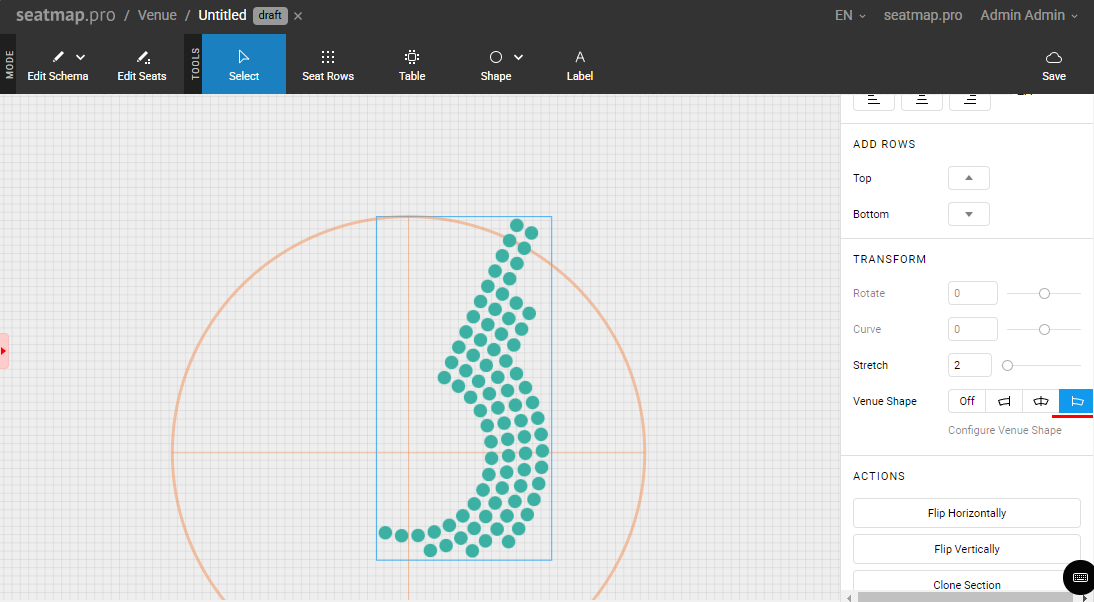
This setting helps save your time in attempts to adjust the size of a section and the degree of its bend, allowing you to create your schemas nice and accurate.
Editing seats in a section
To delete, add, and move seats inside a section, switch to the section editing mode. To do this, double-click the section or select a section and click Edit Seats.
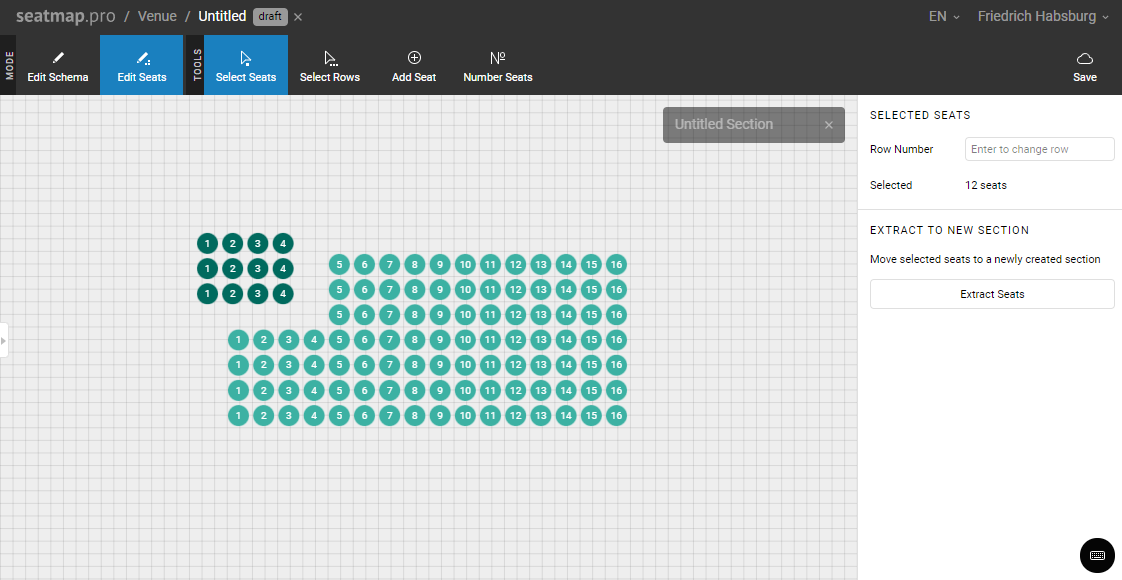
To delete some seats from the section, reassign them to another section and then delete it. To do this, use the Extract Seats tool.
You can also add seats to a selected row using the sidebar.
To exit the section editing mode, click the cross next to the section name in the upper right corner of the workspace.

Numbering seats and rows
To number seats, select the required seats and click Number Seats in the toolbar.
If required, you can do this manually:
- Enter the section editing mode.
- Select a seat.
- Set/change a number in the window that opens.
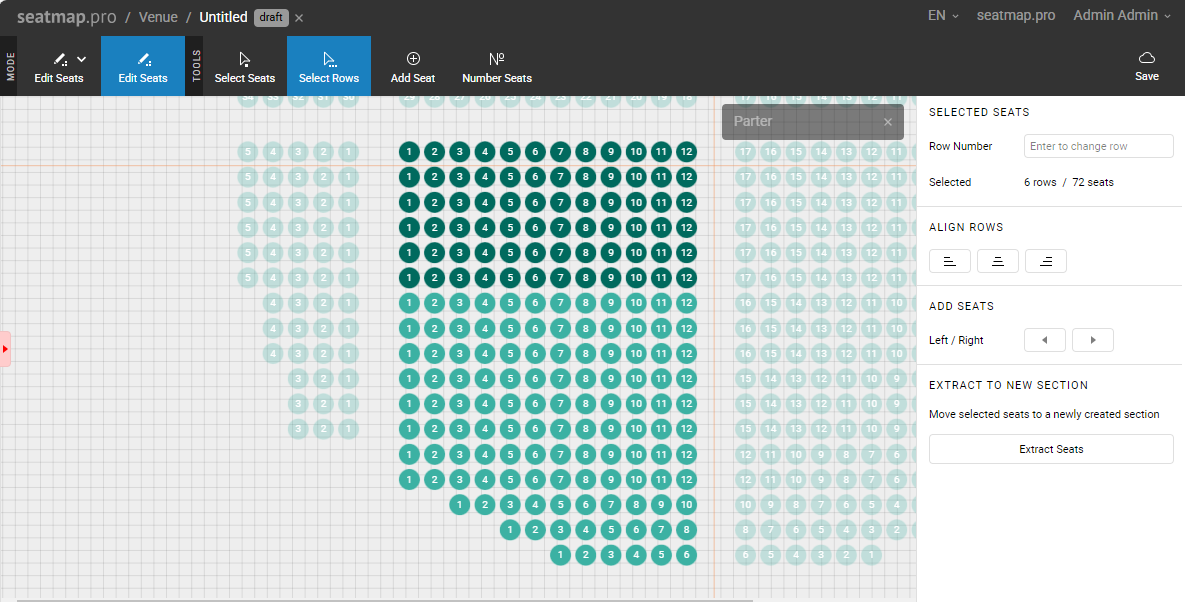
To number rows, click the Select Rows tool and use the numbering panel opened on the right.
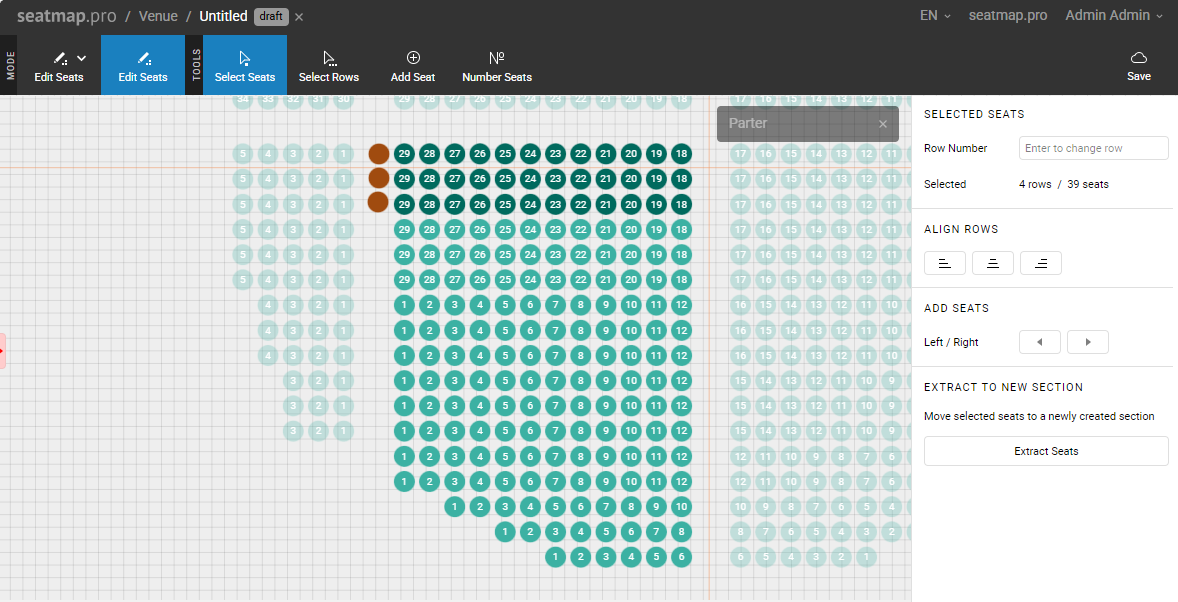
In the Number Seats window, you can range row and seat numbers as well as set the direction of numbering. Use the checkboxes to specify wether to assign numbers to rows, seats, or both.
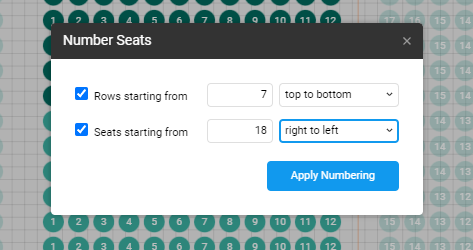
Click Apply Numbering to confirm the settings.
Manually-added seats are not automatically assigned to any row. Do not forget to number them as well.
Managing tables
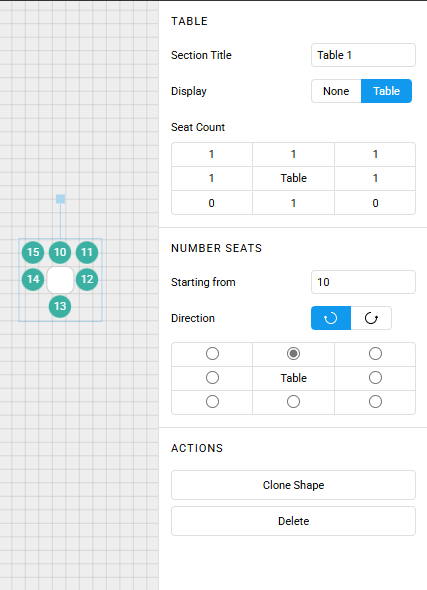
To add a rectangular table to your schema, click Table. To add a round table, click Round Table. A new table will appear in the center. Drag it to the desired position. Use the panel on the right to configure the table:
- Specify the table name if required.
- If you do not want the table to be displayed, select Display: None. In this case, only seats are visible.
- For rectangular tables, select how many chairs are to be at the table and on which side. To put a chair, specify 1, to remove a chair, specify 0.
- For round tables, set the total number of seats, starting position, and numbering direction. Resize the table non-uniformly to create an elliptical shape. See Round and Elliptical Tables for details.
- Choose a number from which to start seat numbering.
- Choose the numbering direction (clockwise or anticlockwise).
Double-click any table to enter table editing mode, where you can select individual seats and set them as hidden, accessible, or marked.
On the same panel you can clone or delete the shape.
Assigning pricing zones
If you assign pricing zones to seats and tables, this information will not be lost in case you copy your schema later for other events.
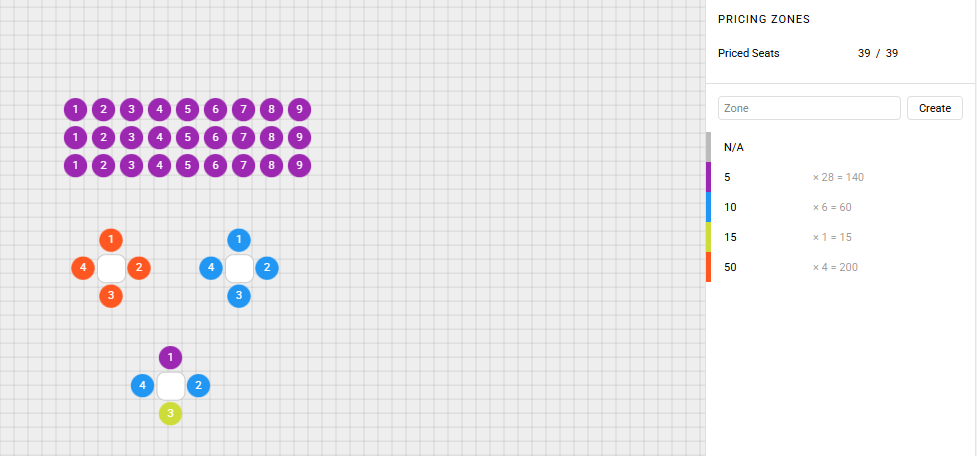
Click Pricing Zones. The panel on the right shows:
- the number of priced seats out of the total number of seats
- a list of available prices
To add a price, enter a number into the field and click Create. The price will appear in the list below. To edit or delete a price, hover over it and click the corresponding button that appears next to it.
To assign a pricing zone:
- Select a seat, a row, a number of rows, or a table.
- Click the required price on the right panel.
- Repeat Steps 1-2 for each object you want to assign a pricing zone to.
As a result:
- The selected objects are assigned the corresponding price zone and get highlighted with the same color as the price.
- The number of seats next to the used price increases.
- The number of priced seats is updated accordingly.
Other venue objects
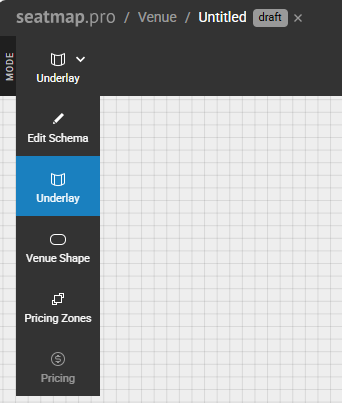
To display the venue’s entrance zones, stages, and other objects, upload an underlay prepared in any vector editor (Adobe Illustrator, Inkscape, Sketch, Figma) in SVG format. To do this, switch to the underlay mode by selecting the Underlay option in the drop-down menu.
After the underlay is loaded, it usually needs to be adjusted to the schema.
In the underlay mode, drag the mouse in the workspace to shift the underlay relative to the drawn sections.
Drag the mouse up or down with the Shift key held down to increase or decrease the size of the underlay, adjusting it to the desired size.
If the underlay is to be drawn and there are sections drawn in the schema, then do the following:
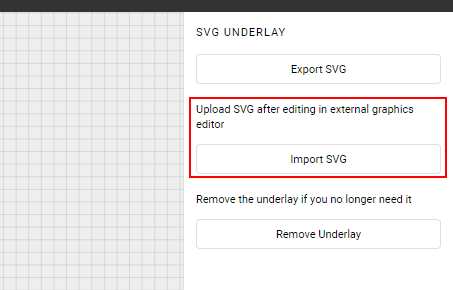
- Export the schema to SVG.
- In the graphic editor, draw the necessary objects, focusing on the seats location.
- In the graphic editor, delete the seats.
- Export the image created in the graphic editor to SVG.
- Load the underlay and adjust its position if necessary.
Making the SVG underlay interactive
After the underlay is adjusted to the schema, you need to bind the non-GA sections to it. Do the following:
- Select the Underlay mode.
- Click the arrow on the left to open the side panel.
- Click the required section (the arrow next to its name will change for a map icon).
- Click the position of the selected section in the underlay.
- Click Save (or click the map icon).
Now, the section is bound to the underlay. After you assign prices at least to some seats in the section, you will be able to see the section’s outline when selecting it.
If you bound an incorrect section by mistake, repeat Steps 1-5 to fix this.
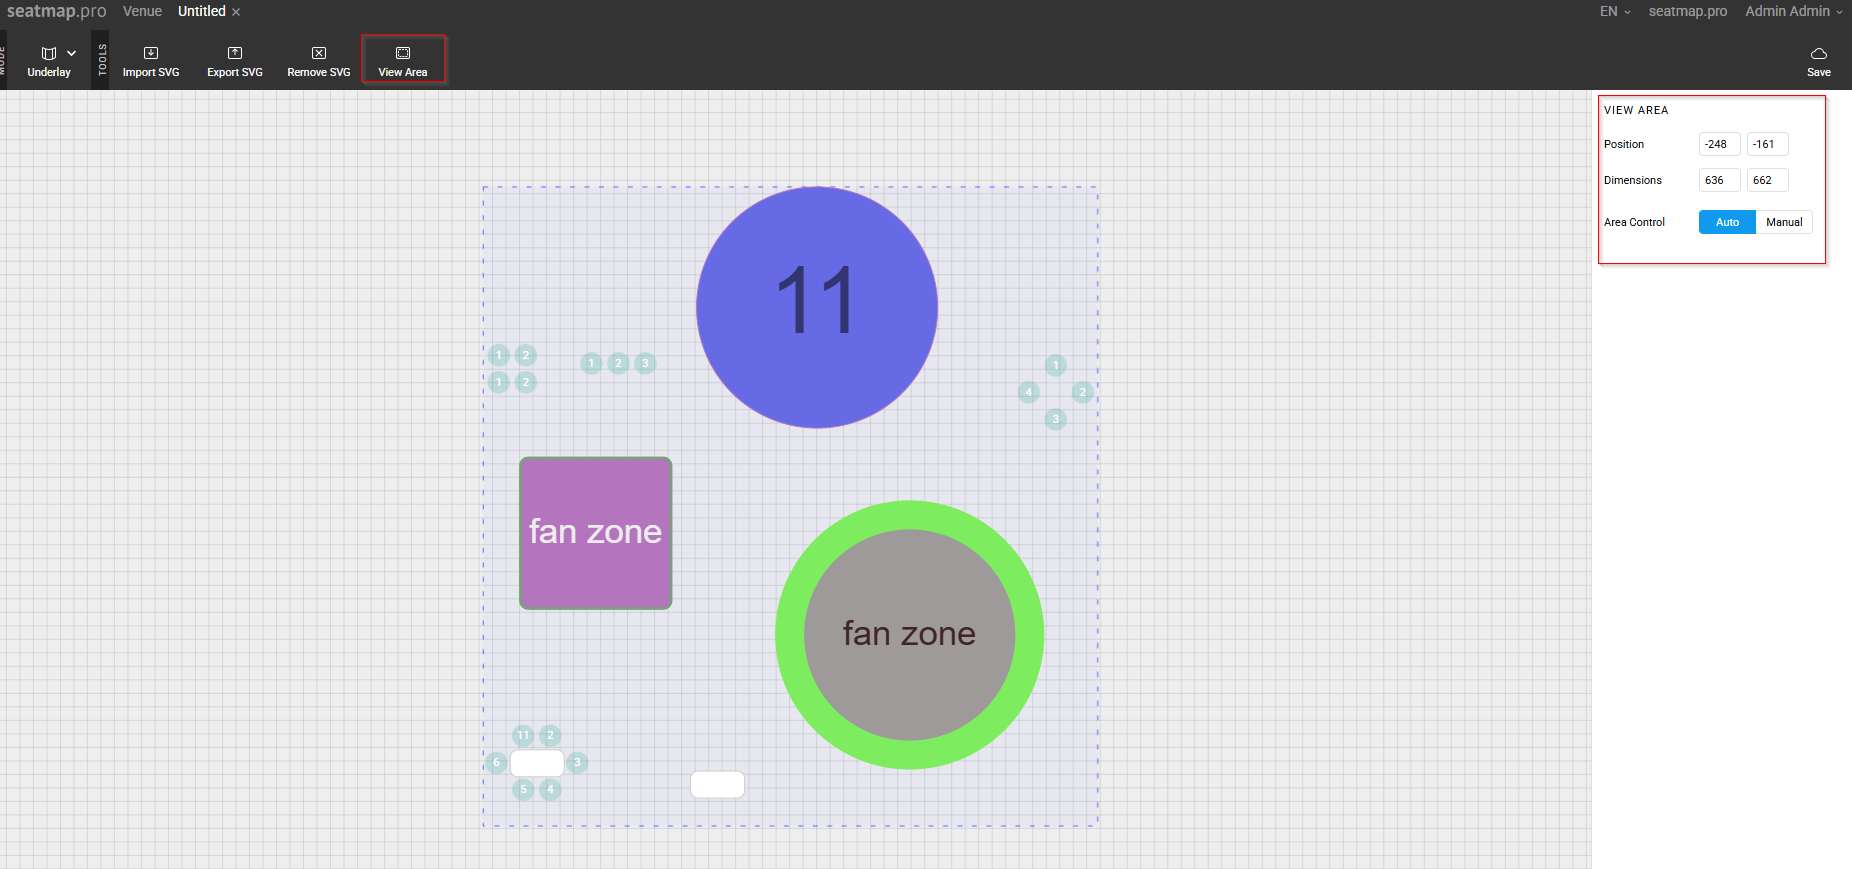
Managing the view area
You can manually control the SVG borders in Editor to make sure it includes all the required elements.
To manage the borders:
- Select the Underlay mode.
- Click View Area.
- On the View Area panel on the right, select Manual to adjust the borders as you wish.
- Either drag the rectangle of the view area as required or specify its position/dimensions on the panel.
If you select the Auto option on the panel, the view area will automatically include all the available elements.
Filtering sections
Now, when you have a number of various sections, you can filter your schema by section names to quickly focus on an object.
To do this:
- Click the arrow on the left to expand the left panel.
- Select the name of the required object.
As a result, the object will get centered and focused.
Saving a schema
Make sure the schema has the correct name, change it if necessary in the right panel, and click the Save button in the toolbar.
Don’t forget to save the changes you’ve made.
If you want to undo unsaved actions, refresh the browser page.
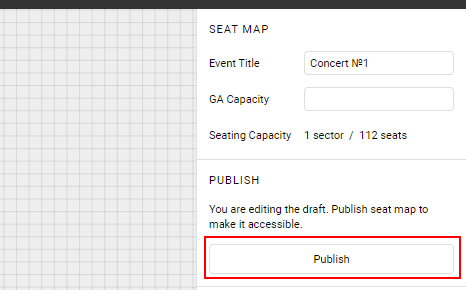
Publishing a schema
Initially, schemas are in the Draft status. This allows you to save the intermediate result of the work.
When the schema is complete and you are ready to assign prices, you can publish it.
If you don’t see the block for editing the schema name or publishing, you are probably in the section editing mode or you have objects selected on the schema. Exit the section editing mode or reset the current selection by clicking outside of it.
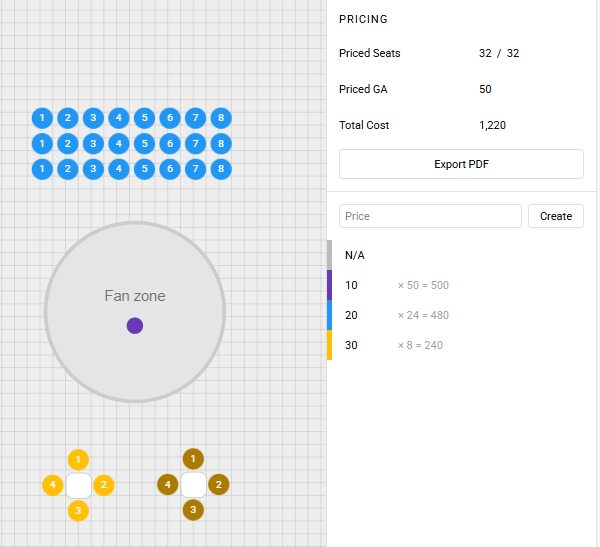
Managing prices
You can only manage prices after you publish the schema.
To manage prices, click Pricing.
The panel on the right shows:
- the number of priced seats out of the total number of seats
- the number of tickets for the GA sections
- the total cost (the cost of the priced seats + the cost of the tickets for the GA sections)
- a list of available prices
To add a price, enter a number into the field and click Create. The price will appear in the list below. To edit or delete a price, hover over it and click the corresponding button that appears next to it.
Assigning prices to seats one-by-one
To assign a price to a particular seat (including a seat at a table):
- Click Select Seats.
- Click a seat.
- Click the required price item on the right panel.
As a result:
- The seat is assigned the corresponding price and gets highlighted with the same color as the price.
- The number of seats next to the price increases and the total cost of the same-price seats is updated accordingly.
- The number of priced seats and total cost at the top of the panel are updated accordingly.
Assigning prices to rows of seats
To assign a price to one or more rows of seats:
- Click Select Rows.
- Click one or more rows.
- Click the required price item on the right panel.
As a result:
- All the seats in the row are assigned the corresponding price and get highlighted with the same color as the price.
- The number of seats next to the price increases and the total cost of the same-price seats is updated accordingly.
- The number of priced seats and total cost at the top of the panel are updated accordingly.
Assigning prices to tables
To assign a price to a table:
- Click Select Sections.
- Click the required table.
- Select the required price on the right panel.
- In the popup, specify whether the price is for the entire table or per seat.
To assign different prices for the seats round a table, select each seat separately using the Select Seats tool.
- Click Assign.
As a result:
- The table seats are assigned the corresponding price and get highlighted with the same color as the price.
- The number of seats next to the price increases and the total cost of the same-price seats is updated accordingly.
- The number of priced seats and total cost at the top of the panel are updated accordingly.
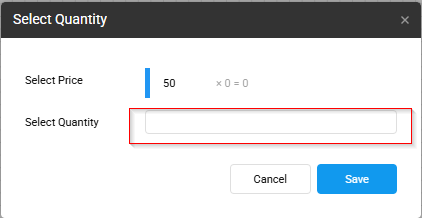
Assigning prices to GA sections
To assign a price to a GA section:
- Click Select Sections.
- Click the required GA section.
- In the popup, select the price and specify the number of tickets (i.e. the section capacity).
- Click Save.
As a result:
- The GA section is assigned the corresponding price and gets marked with the same color as the price.
- The number of tickets next to the price increases and the total cost of the same-price tickets is updated accordingly.
- The number of GA tickets and total cost at the top of the panel are updated accordingly.
After you assigned prices to a GA section, you cannot delete this section.
Deleting a GA section with prices assigned
If you need to delete a GA section with prices, unassign the price first. Do the following:
-
Select the Pricing mode.
-
Click Select Sections.
-
Click the required GA section.
-
In the popup, leave the Select Quantity field blank.
Unassigning prices for a GA section -
Save the changes.
-
Select the Edit Schema mode.
-
Delete the GA section.