Getting started
To understand how to integrate seatmap.pro into your ticketing system lets review and match overall simplified lifecycle of tickets during a reserved ticketing event.
In this document, we assume that you already have some ticketing system.
In a common scenario, we need to accomplish the following steps:
- Create a schema for a venue.
- Create an Event.
- Assign prices to the seats (bind the event and schema).
- Show the sales page to customers, and allow them to interact with the seating chart.
- Add selected seats to the cart.
- Check them out.

Composite keys
To address any attributes to specific seats on a chart (price, state, and so on), seatmap.pro uses natural language composite keys.
For example, if you have a seat named: Section B, Row 5, Seat 14 – composite key will be Section B;;5;;14.
So, to assign a price to a seat, lock, unlock, and do any operation, composite keys shall be considered as the main option.
General admission: Seats shall be addressed by the section name.
Step 1. Create a schema
Please refer to the Editor documentation to learn how to create and manage seating plans.
When a schema is created and published, it is ready to be exposed by API. Please see the Venues section to get more details.
Step 2. Create an event
The event is an entity that binds prices and seats for a single show.
In seatmap.pro you can assign more than one event to the schema.
For example, if you have several events of one artist with the same show at the same venue you probably want to have the same seating chart for all events.
Be advised that in your terminology Event might be Instance or Show.
Event creation should be a synchronized operation between your Event storage and seatmap.pro.
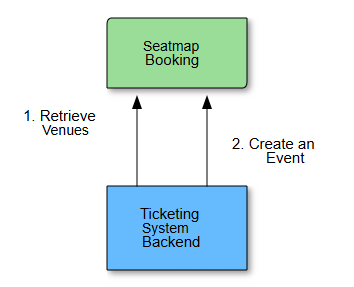
For example, if you want to create an event named “Test event” you should perform two simple requests:

- Retrieve schemas and venues list
- Create an Event linked to the selected schema
Important The created Event ID should be saved on your side to specify it during Renderer’s initialization on the Sales page.
Now, when the event contains a linked schema, let’s assign prices to the event.
Step 3. Assign prices
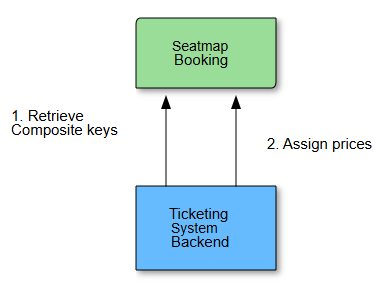
To assign a price to the seats you should use Composite keys.
To retrieve all composite keys for a schema, please use the corresponding method
getMetafrom the Venues section.

- It is an optional step, just to validate your namespace.
- The assign price command sends an Array of key/values like composite key/price.
Step 4. Show seating plan to the user
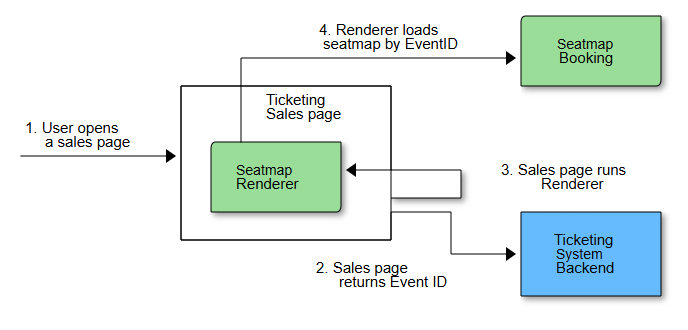
The user opens the sales page in a browser.
Without integrating seatmap.pro, you just show the Event description and your approach to seat selection to the User.
To integrate the Renderer component into your sales page, you need to initialize the JS component and transfer the following values to it:
- The public key (Security).
- Event id saved on Step 2 during Event creation.
- Callbacks for the handling of mouse/touch events.

- The Sales page should be rendered or filled with a data from the Ticketing System Backend.
- Event ID saved on Step 2 shall be returned to the Sales page.
- The Sales page initializes the Renderer with Event ID.
- The Renderer fetches all information by Event ID and initializes a seating chart.
After the initialization phase, the Renderer retrieves all the data including the seating chart and prices by Event ID from Booking API. Now it is ready to interact.
Operations with seats
The Renderer has callbacks for the basic events like:
- Seat selection.
- Seat deselection.
- onHover, onBlur, etc.
Here, for the getting started purposes we are interested in how to integrate the ticket selection process and convert it into a successful purchase.
Your sales page handles callbacks including onSeatSelect.
After catching this event you have two options:
- Collect all the seats is a cart without any interactions with server-side, or.
- On each select/deselect event do preliminary locks on objects.
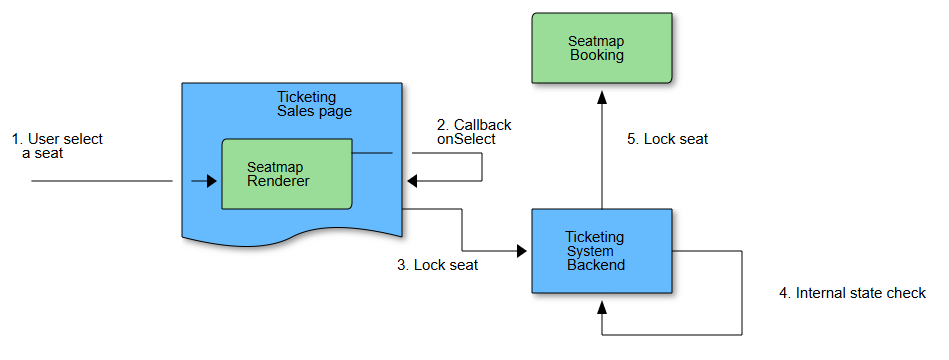
Let’s consider the most complicated scenario — lock per click.

- User clicks on a seat.
- The Renderer component runs callback function to notify the Sales page about en event.
- The Sales page trying to lock a seat and sending the locking request to the Ticketing Backend.
- The Ticketing Backend checks the seat’s state in accordance with internal logic.
- In case if lock operation is available the Ticketing Backend sends lock request to the Booking service.