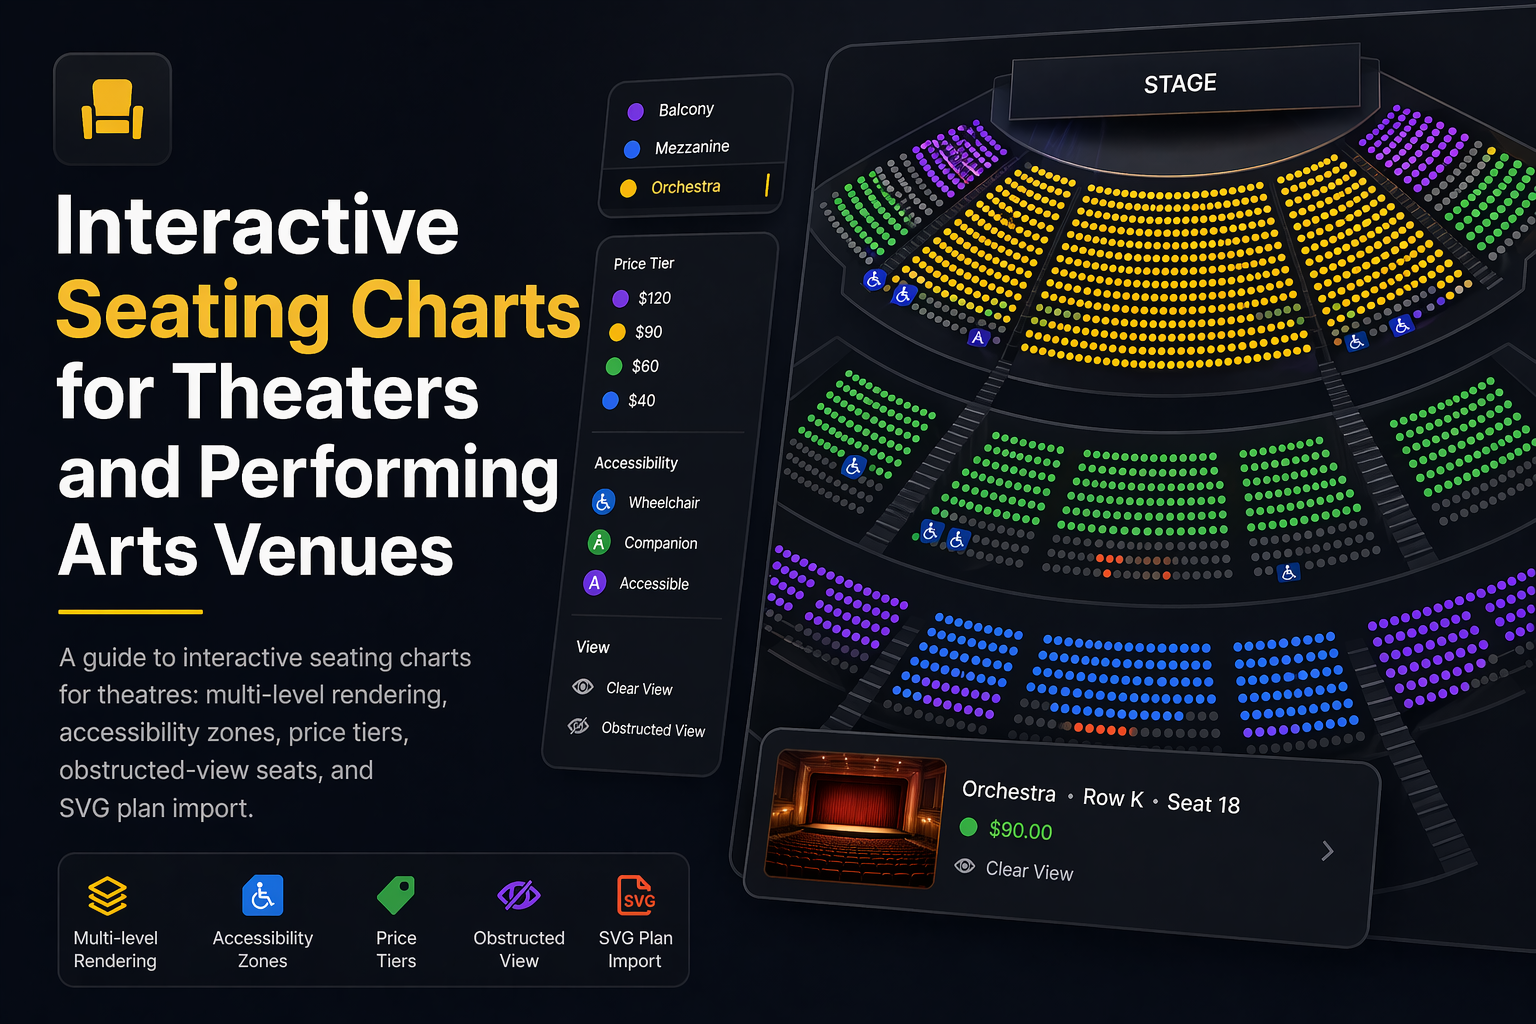
Interactive Seating Charts for Theaters and Performing Arts Venues
A guide to interactive seating charts for theatres: multi-level rendering, accessibility zones, price tiers, obstructed-view seats, and SVG plan import.
A non-technical guide to adding an interactive seating plan to your event website -- iframe vs SDK, what your dev team needs, timeline, and vendor questions.
If your event website has been selling seats through a text list, a dropdown, or a simple form, you already know the cost. Buyers cannot picture where they will actually sit, so they hesitate. Some drop out of the funnel. Others pick wrong and open a support ticket. An interactive seating plan – the kind where customers can see the venue from above, zoom into the section they want, and click the exact seat – fixes this at a level no amount of copy or photography can match.
The good news is that adding one does not mean rebuilding your ticketing platform. Modern seating chart software is designed to integrate into what you already have. This guide walks non-technical decision makers through the choices you need to make, the timeline you should expect, and the questions you should ask vendors before signing.
For the technical specifics — SDK setup, Booking API v2, and copy-paste code samples for React, Next.js, and vanilla JavaScript — see the complete SDK and Booking API v2 setup.
There are three things an interactive seating chart does that a list view cannot:
The outcome is measurable – completion rates go up, average ticket price goes up, and support volume for “which seat am I in?” questions drops to near zero.
There are two realistic ways to add an interactive seating plan to an existing event site. Each has a clear tradeoff between speed and control.
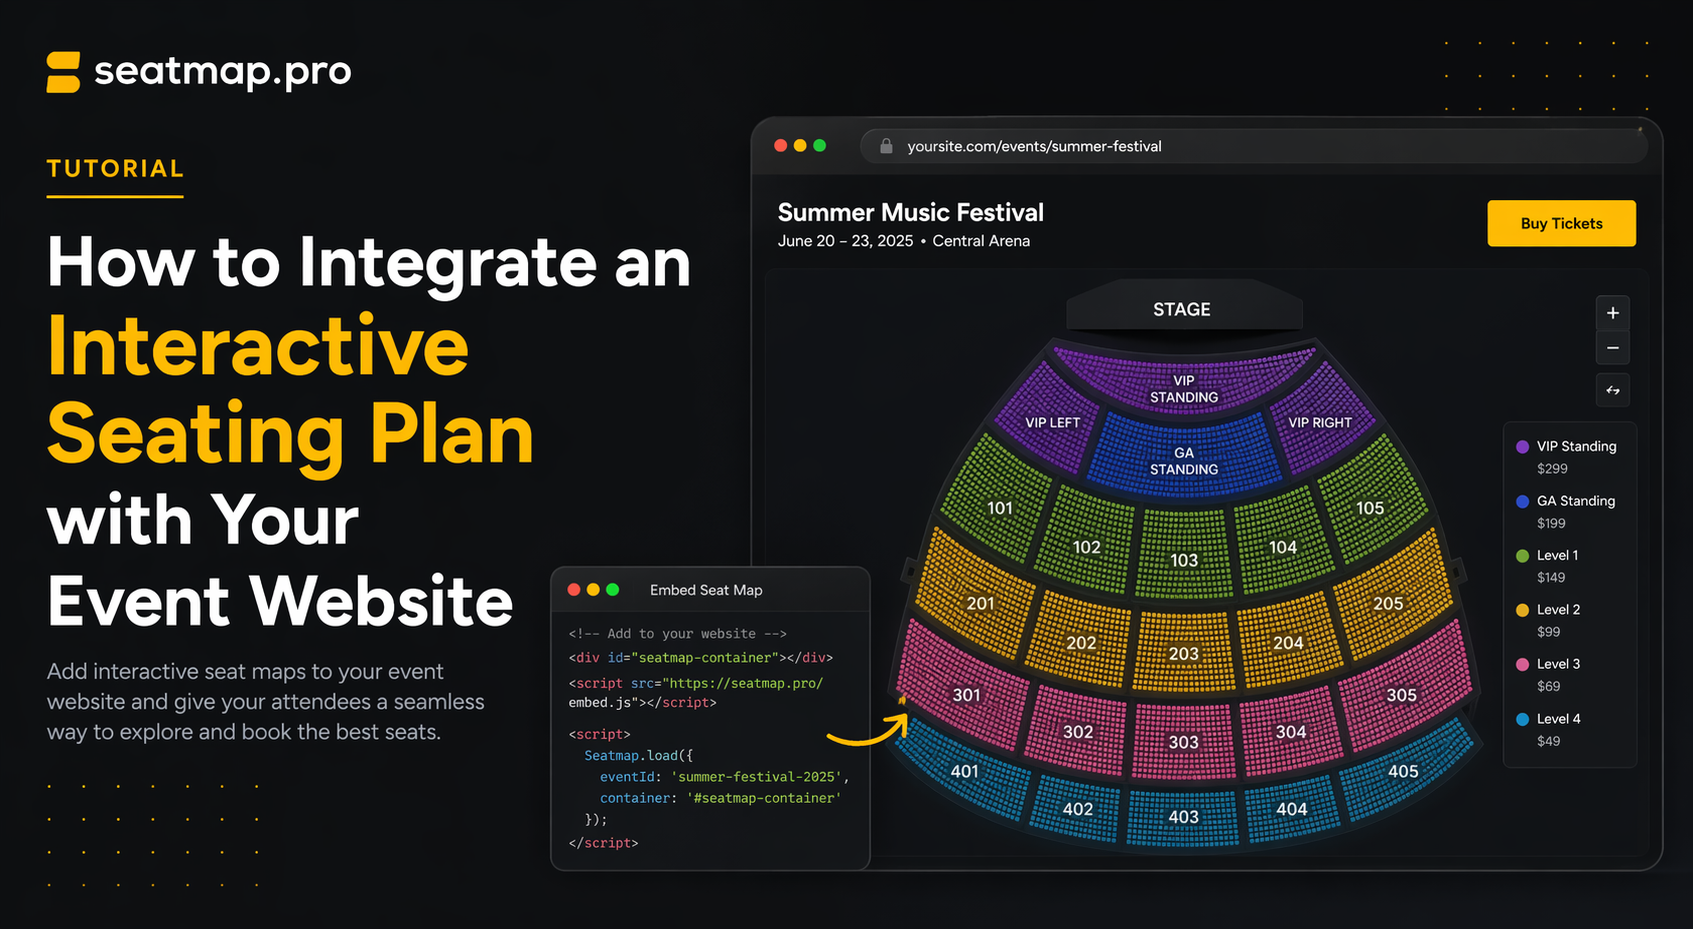
The seating chart loads inside an iframe hosted by the vendor. Your event page embeds a short HTML snippet, and the interactive chart appears inline. Communication between the iframe and your page happens through a secure postMessage API – your cart hears about seat selections, and the iframe hears about your branding.
Strengths
Tradeoffs
The seating chart runs as a JavaScript library inside your own page, rendered by your own code. Your frontend developer installs the SDK, initialises it with a container element and an event ID, and wires the seat selection callbacks to your existing cart and checkout flow.
Strengths
Tradeoffs
For most single-venue operators who want to go live quickly, iframe is the right starting point. For ticketing platforms, tour promoters, and venues that want a polished native experience, SDK integration is worth the extra effort.
The most common question we get from non-technical buyers is “what will my developer ask me for?” Here is the short list, regardless of approach.
A container on your event page. A single div element with a fixed height – usually 600 to 800 pixels on desktop – where the seating plan will render.
A public API key. Provided by the seating chart vendor. Safe to include in the frontend (it is scoped, rate-limited, and cannot be used to make destructive changes).
An event ID. Returned when your team creates the event in the vendor’s admin UI or via an API call from your backend.
A cart or reservation endpoint on your backend. When a customer selects a seat, the frontend calls your backend to reserve it. When they deselect, it unreserves. This is usually a 30-to-50-line change to your existing cart logic, not a new subsystem.
A pricing strategy. Decide whether pricing lives in the seating chart’s schema or in your own system. For simple events the chart’s schema is fine; for dynamic pricing, your backend owns the numbers and the chart just renders them.
That is the full dependency list. You do not need a new database, a new payment processor, a new identity system, or a new deployment pipeline.
A full Seatmap Pro SDK integration – the renderer running natively inside your event page, wired to your own cart and checkout, no iframe – can be live in as little as three days. That is the realistic lower bound when the platform’s SDK is well-documented, the API is stable, and your checkout only needs a small wiring change to accept the selected seats.
More involved scopes take longer. Branded styling with custom overlays, a multi-venue rollout across a ticketing platform, or a multi-tenant white-label build typically runs in weeks rather than days. In every case the long tail is not the seating chart itself – it is your existing checkout, payment reconciliation, and order management integrations. Budget half the total timeline for “plugging the new seat selector into the systems you already run”.
Most seating chart vendors demo well. The things that matter in production are rarely what the demo highlights. When you shortlist, make sure you get a straight answer to each of these.
Performance
Reliability
Pricing model
Deployment and data
Developer experience
Customisation
Evidence
A vendor who answers these crisply, in writing, and can back each answer with a live example is a vendor who has shipped this at scale. A vendor who hedges on any of them is a vendor whose product will surprise you in month three.
Seatmap Pro is built for this exact integration. Venues are modelled once in the Editor – sections, rows, seats, prices, accessibility zones – and reused across every event. The Booking Renderer (@seatmap.pro/renderer) embeds into your site with either an iframe or the SDK, and the Booking API handles lock-per-click, real-time availability, and checkout hand-off. On-premise and cloud deployments are both first-class, pricing is flat rather than per-seat, and there are TypeScript SDKs for every major frontend framework.
If you would like to see what the integration actually looks like against a venue close to yours, request a demo and we will walk through the full workflow. If your team is technical and wants to start reading code, How to Build a JavaScript Seating Chart for Your Website covers the same ground from the developer side, and the Renderer SDK Getting Started guide is the 20-minute path to a working prototype.
For a deeper look at the platform compared to alternatives, Seatmap Pro vs Seats.io covers rendering technology, pricing, deployment, and SDK design in detail. And if you are still weighing whether an interactive chart is worth the investment, Why 2D seat maps with view-from-seat are boosting ticket sales more than 3D and Transforming empty seats into revenue make the commercial case with data.
A guide to interactive seating charts for theatres: multi-level rendering, accessibility zones, price tiers, obstructed-view seats, and SVG plan import.
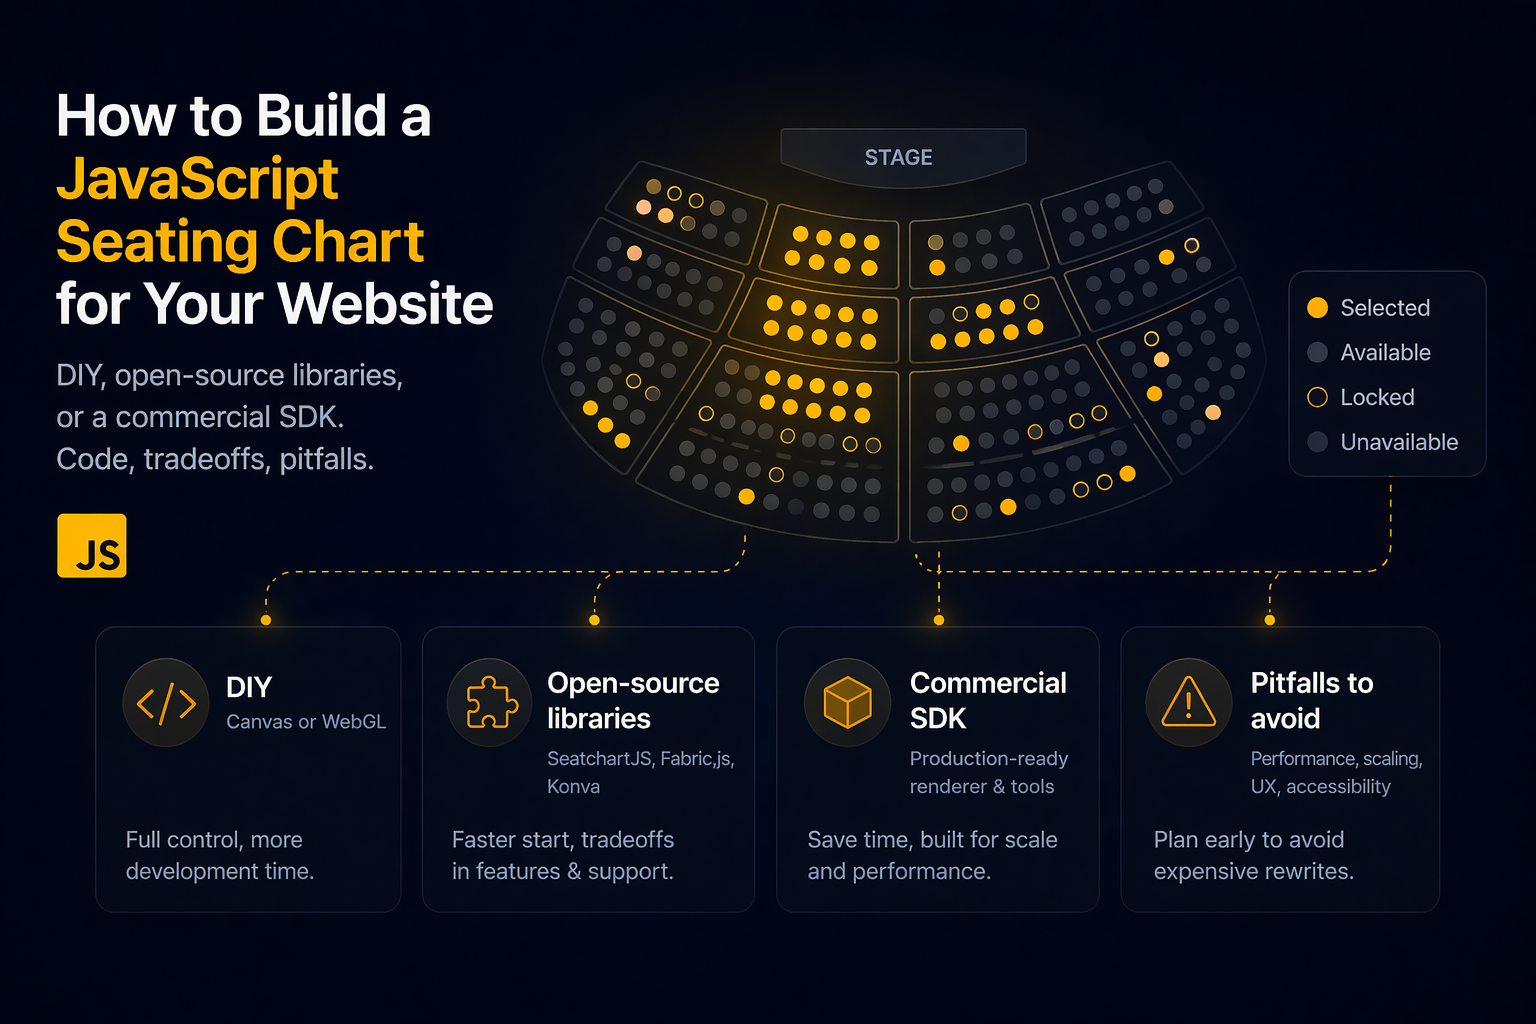
Build a JavaScript seating chart: DIY Canvas/WebGL, open-source libraries (SeatchartJS, Fabric.js, Konva), or a commercial SDK. Code, tradeoffs, pitfalls.
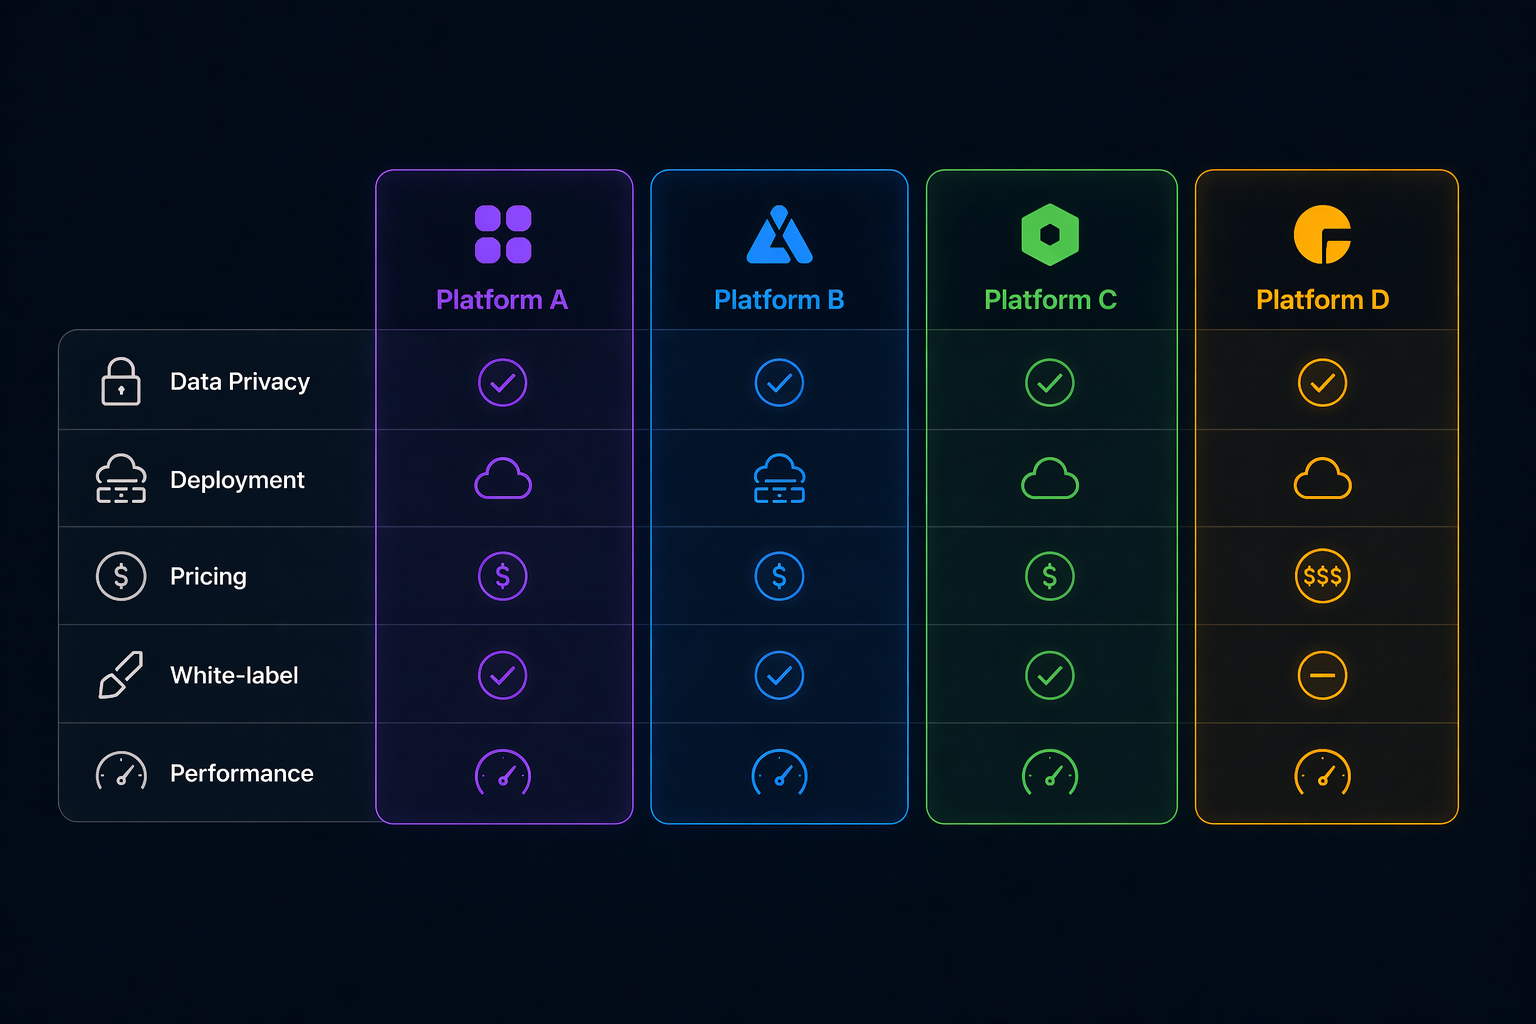
Looking for Seats.io alternatives? Compare 4 seating chart platforms by rendering, pricing, deployment, and API. Find the best fit for your ticketing system.