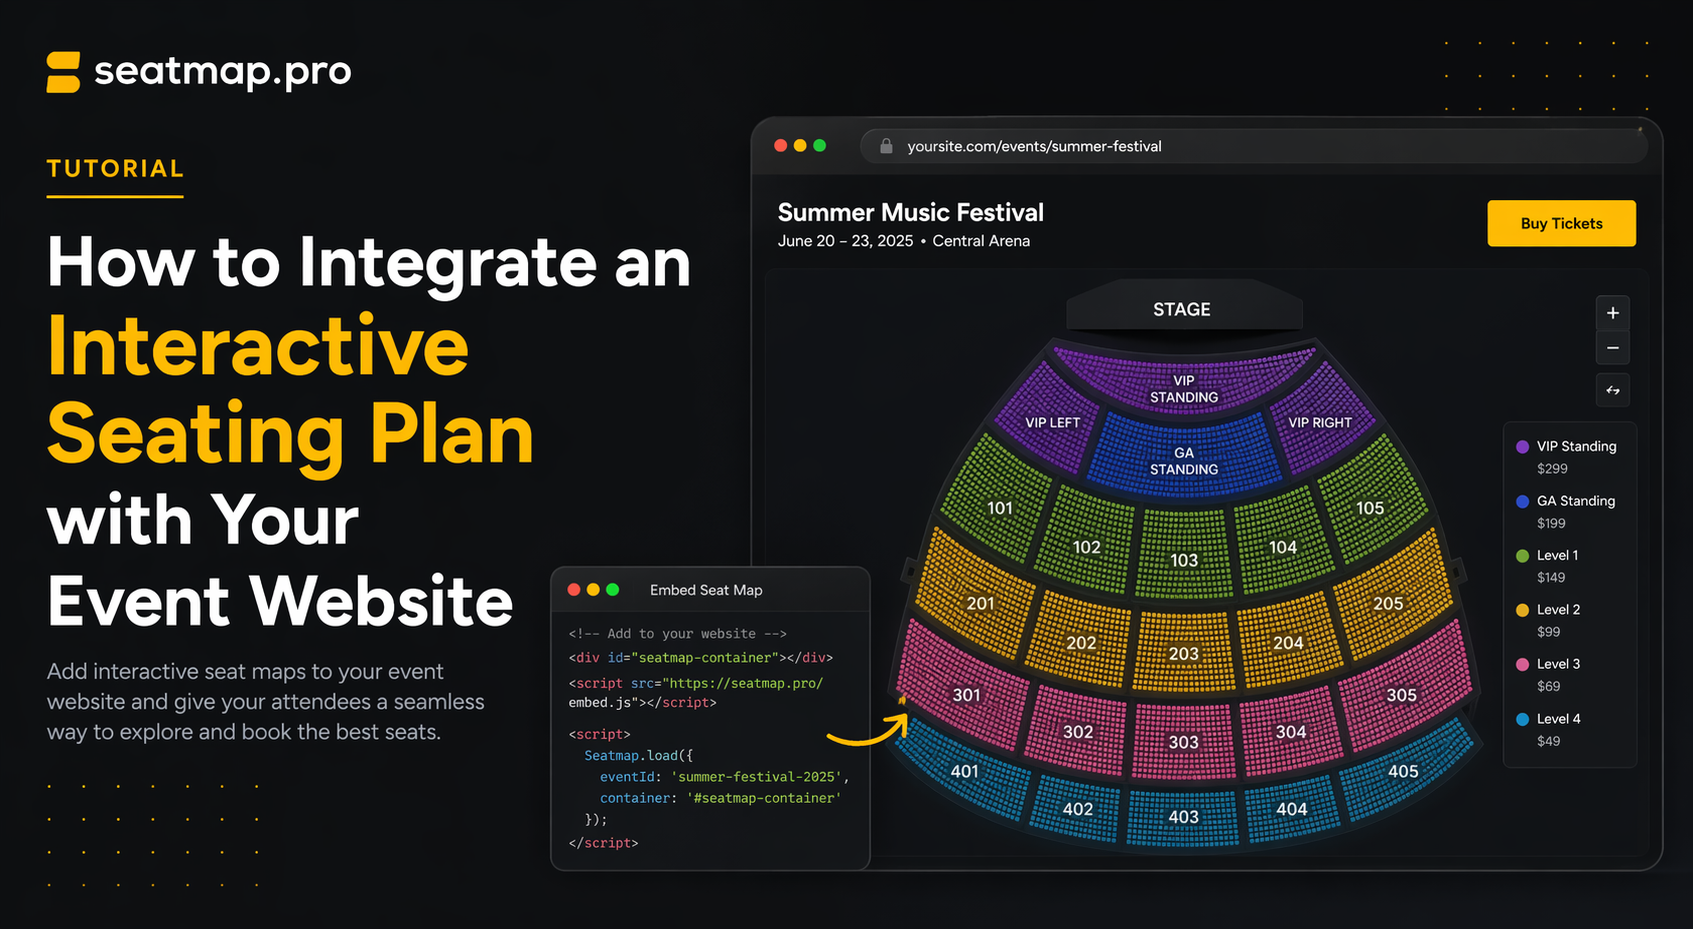
How to Integrate an Interactive Seating Plan with Your Event Website
A non-technical guide to adding an interactive seating plan to your event website -- iframe vs SDK, what your dev team needs, timeline, and vendor questions.
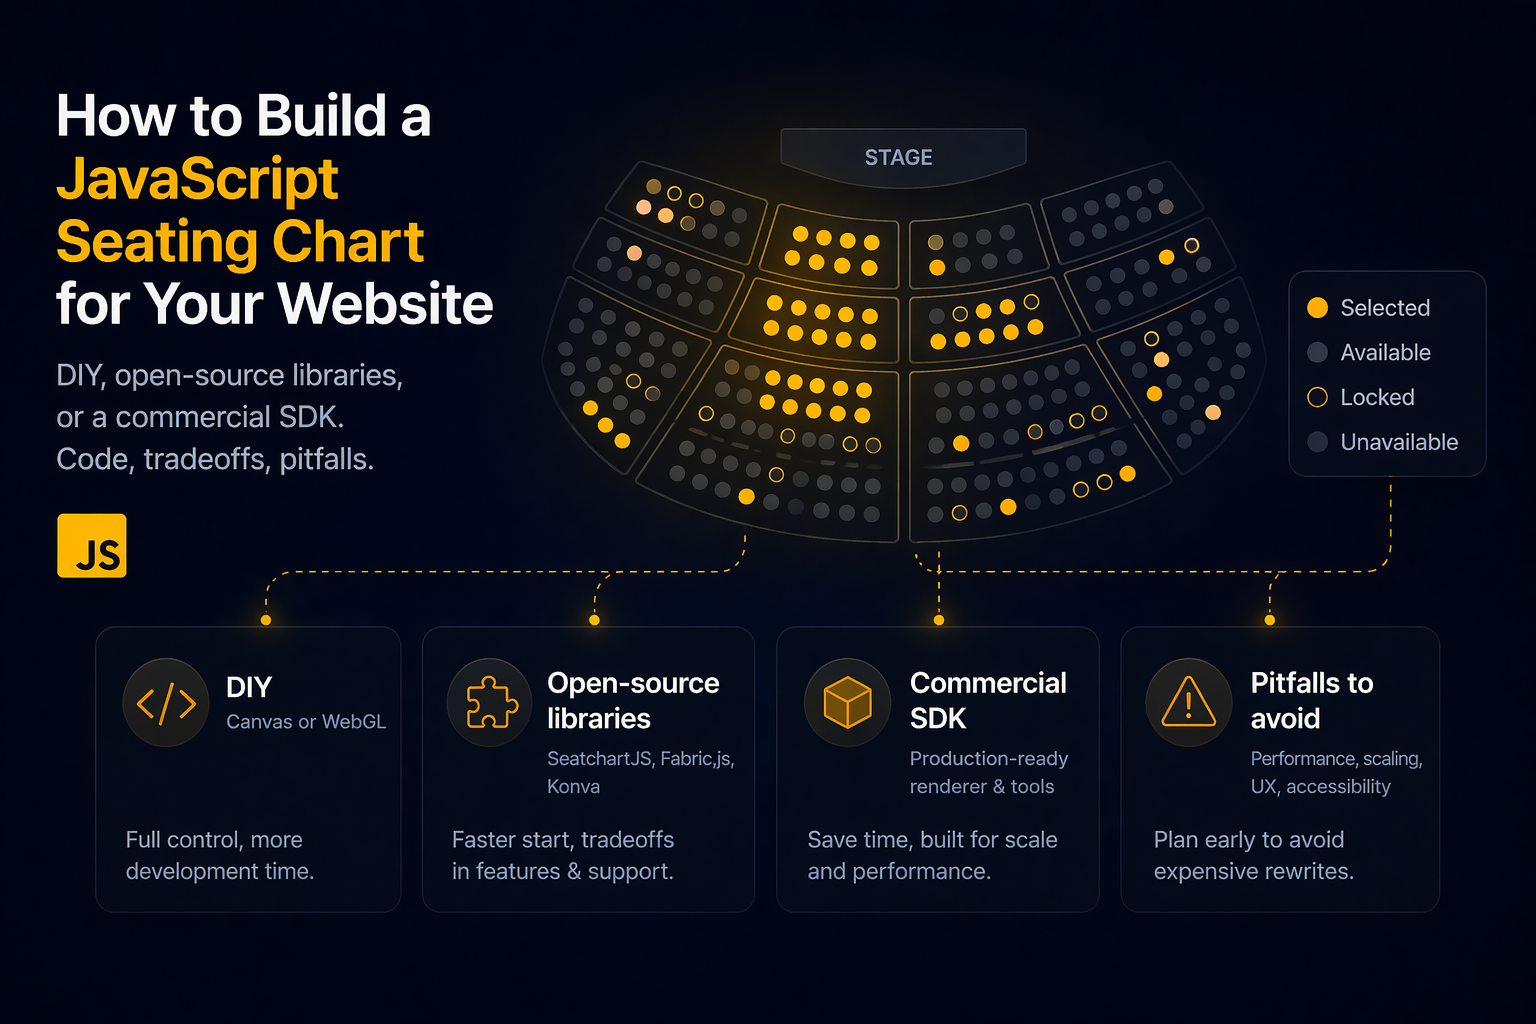
Build a JavaScript seating chart: DIY Canvas/WebGL, open-source libraries (SeatchartJS, Fabric.js, Konva), or a commercial SDK. Code, tradeoffs, pitfalls.
If you are building or redesigning an event ticketing site, the seat picker is the single most valuable interaction on the page. Customers decide in seconds whether to trust your platform based on how it loads, whether the section they want is obviously clickable, and whether a seat they just picked actually stays theirs through checkout. Getting this right is the difference between completing the sale and pushing the buyer back to a competitor.
This guide walks through the two realistic paths to shipping a JavaScript seating chart on your website – building it from scratch with Canvas or WebGL, or integrating an existing SDK – with working code for React, Vue, and vanilla JavaScript, honest tradeoffs, and a decision framework you can apply today.
Before writing a single line of code, it helps to enumerate what a production-grade JavaScript seating chart is responsible for. It is not just “draw some rectangles and handle clicks”.
Any approach you choose has to cover all of these. Keep this list close when you evaluate tradeoffs below.
There are three ways to ship an interactive seat picker in production:
HTML tables (the fourth option from ten years ago) are not viable for modern ticketing – DOM overhead kills performance past a few hundred seats. We covered the full history of rendering approaches in Seating plans. How do we render?; this post focuses on what to do right now.
Canvas 2D is the sweet spot for venues between 1,000 and 50,000 seats. It draws pixels directly rather than keeping DOM nodes for every seat, which means you can push tens of thousands of objects through a single render pass without the browser grinding to a halt.
Here is a minimal vanilla-JavaScript Canvas seat picker that lays out a 20-by-30 block of seats, colours sold seats differently, and logs selections on click:
<canvas id="chart" width="900" height="600" style="cursor: pointer;"></canvas>
const canvas = document.getElementById('chart');
const ctx = canvas.getContext('2d');

const SEAT_SIZE = 18;
const GAP = 4;

const seats = [];
for (let row = 0; row < 20; row++) {
  for (let col = 0; col < 30; col++) {
    seats.push({
      id: `r${row}-c${col}`,
      x: 40 + col * (SEAT_SIZE + GAP),
      y: 40 + row * (SEAT_SIZE + GAP),
      status: Math.random() < 0.15 ? 'sold' : 'available',
      selected: false,
    });
  }
}

function render() {
  ctx.clearRect(0, 0, canvas.width, canvas.height);
  for (const seat of seats) {
    if (seat.status === 'sold') {
      ctx.fillStyle = '#c7c7c7';
    } else if (seat.selected) {
      ctx.fillStyle = '#2563eb';
    } else {
      ctx.fillStyle = '#34d399';
    }
    ctx.fillRect(seat.x, seat.y, SEAT_SIZE, SEAT_SIZE);
  }
}

canvas.addEventListener('click', (event) => {
  const rect = canvas.getBoundingClientRect();
  const x = event.clientX - rect.left;
  const y = event.clientY - rect.top;
  for (const seat of seats) {
    if (
      seat.status !== 'sold' &&
      x >= seat.x &&
      x <= seat.x + SEAT_SIZE &&
      y >= seat.y &&
      y <= seat.y + SEAT_SIZE
    ) {
      seat.selected = !seat.selected;
      render();
      console.log('selection changed', seat);
      break;
    }
  }
});

render();
That is maybe 40 lines and it works. Before you declare victory, though, notice what is missing: pan and zoom, hover highlighting, section overviews, real-time availability, accessibility, touch gestures, locking, and the hundreds of edge cases that turn a demo into a shippable product. A production-grade Canvas seating chart is closer to 20,000 lines than 40.
The main things you will end up building yourself:
If you have a specialist graphics engineer on the team and a venue large enough to justify the investment, building a Canvas renderer from scratch is an honest choice. For most teams it is a 6-to-12-month project that eats bandwidth you could spend on your actual ticketing product.
Between writing everything from scratch and integrating a turn-key SDK, there is a middle ground: use an open-source library as the rendering foundation and build the booking logic yourself. This is a realistic option for teams that want full control over the UX, do not need the full backend (real-time availability, locks, analytics), and have the engineering time to wire it all up. The space divides into two groups – dedicated seat-picker libraries, and general-purpose graphics frameworks you compose into one.
SeatchartJS (MIT) is the most mature dedicated OSS option. It is a small, no-dependency TypeScript library that renders a grid of seats with categories, handles selection, and emits events. No backend, no real-time sync, no lock flow – you bring your own. It works well for cinemas, classrooms, and small theatres where the seat layout is a mostly-rectangular grid. It does not scale to stadiums or multi-section arenas without significant extension.
Smaller projects exist on npm (react-seat-picker, seatmap, venue-seating-chart) but most are abandoned or scoped to a single narrow use case. Check the commit history, open-issues count, and the bus factor of the maintainer team before committing to any of them – an unmaintained seat picker is a future migration you did not budget for.
If the dedicated options are too limited, the next layer down is general-purpose Canvas, WebGL, or SVG libraries you compose into a seat picker. These give you pan, zoom, hit-testing, layers, and event handling; you spend your time on seating-chart logic rather than reinventing a rendering engine.
Whichever library you choose, the seating-chart logic on top of it is still yours: layout algorithms, level-of-detail switching, hit-testing for thousands of seats, accessibility fallbacks, availability sync, and the lock flow that prevents double-booking.
Open source gives you rendering primitives, freedom from vendor lock-in, zero license cost, and full source-code access for customisation or audit. That last point matters for teams with strict no-dependency policies or regulated environments where every third-party call has to be justified.
What open source does not give you:
If the rendering engine is genuinely the hard part for your team and you can bring the rest yourself, open source is a legitimate path. If the rendering engine is just one of many things you would rather not own, a commercial SDK that bundles rendering with the Booking API is usually the faster ROI.
The turn-key path is to integrate an SDK that already handles the rendering pipeline, the real-time sync, and the lock flow. Here is the same selection behaviour using @seatmap.pro/renderer, which renders with WebGL under the hood and connects to the Booking API for availability and locking.
<div id="seatmap-root" style="width: 100%; height: 600px;"></div>
<script type="module">
  import { SeatmapBookingRenderer } from 'https://cdn.jsdelivr.net/npm/@seatmap.pro/renderer/+esm';

  const container = document.getElementById('seatmap-root');

  const renderer = new SeatmapBookingRenderer(container, {
    publicKey: 'YOUR_PUBLIC_API_KEY',
    onSeatSelect: async (seat) => {
      await fetch('/api/cart/lock', {
        method: 'POST',
        body: JSON.stringify({ seatId: seat.compositeKey }),
      });
    },
    onSeatDeselect: async (seat) => {
      await fetch('/api/cart/unlock', {
        method: 'POST',
        body: JSON.stringify({ seatId: seat.compositeKey }),
      });
    },
  });

  await renderer.loadEvent('YOUR_EVENT_ID');
</script>
That snippet gives you WebGL-accelerated rendering, pan/zoom with momentum, section-to-seat level-of-detail switching, real-time availability, and lock-per-click anti-double-booking out of the box. The publicKey comes from the Editor Admin panel; the eventId is returned when you create the event via the Booking API v2.
The SDK is framework-agnostic – it mounts into any DOM element – so React integration is just a useEffect that creates the renderer and a cleanup function that destroys it.
import { useEffect, useRef } from 'react';
import { SeatmapBookingRenderer } from '@seatmap.pro/renderer';

type Props = {
  publicKey: string;
  eventId: string;
  onLock: (seatId: string) => Promise<void>;
  onUnlock: (seatId: string) => Promise<void>;
};

export function SeatPicker({ publicKey, eventId, onLock, onUnlock }: Props) {
  const containerRef = useRef<HTMLDivElement>(null);
  const rendererRef = useRef<SeatmapBookingRenderer | null>(null);

  useEffect(() => {
    if (!containerRef.current) return;

    const renderer = new SeatmapBookingRenderer(containerRef.current, {
      publicKey,
      onSeatSelect: (seat) => onLock(seat.compositeKey),
      onSeatDeselect: (seat) => onUnlock(seat.compositeKey),
    });

    rendererRef.current = renderer;
    renderer.loadEvent(eventId);

    return () => {
      renderer.destroy();
      rendererRef.current = null;
    };
  }, [publicKey, eventId, onLock, onUnlock]);

  return <div ref={containerRef} style={{ width: '100%', height: 600 }} />;
}
Two things worth calling out. First, compositeKey is a stable identifier your backend can use to reference the seat across rendering and booking APIs. Second, the cleanup function matters – React will remount the component in development mode (Strict Mode double-invocation), and without destroy() you leak WebGL contexts.
<script setup lang="ts">
import { ref, onMounted, onBeforeUnmount } from 'vue';
import { SeatmapBookingRenderer } from '@seatmap.pro/renderer';

const props = defineProps<{
  publicKey: string;
  eventId: string;
}>();

const container = ref<HTMLDivElement | null>(null);
let renderer: SeatmapBookingRenderer | null = null;

onMounted(async () => {
  if (!container.value) return;
  renderer = new SeatmapBookingRenderer(container.value, {
    publicKey: props.publicKey,
    onSeatSelect: (seat) =>
      fetch('/api/cart/lock', {
        method: 'POST',
        body: JSON.stringify({ seatId: seat.compositeKey }),
      }),
    onSeatDeselect: (seat) =>
      fetch('/api/cart/unlock', {
        method: 'POST',
        body: JSON.stringify({ seatId: seat.compositeKey }),
      }),
  });
  await renderer.loadEvent(props.eventId);
});

onBeforeUnmount(() => {
  renderer?.destroy();
  renderer = null;
});
</script>

<template>
  <div ref="container" style="width: 100%; height: 600px;"></div>
</template>
For the full list of callbacks, settings, and events, see the Renderer Spec. To experiment without signing up, open the Renderer Playground.
| DIY Canvas/WebGL | Open-source library | Commercial SDK | |
|---|---|---|---|
| Time to first render | 2-5 days (demo) / 6-12 months (prod) | 1-2 weeks (simple) / 3-6 months (complex) | Hours |
| Rendering pipeline | You build and maintain | Library provides; you extend | Handled by the SDK |
| Real-time availability | You design and implement | You design and implement | Built-in via Booking API |
| Lock-per-click | You design and implement | You design and implement | Built-in via Booking API |
| Cross-device tuning | You test and fix | Library-dependent; often patchy | Handled by the SDK |
| License cost | Zero (your time only) | Zero | Per plan / seat / booking |
| Customisation ceiling | Unlimited | Unlimited (fork if needed) | Theme config + callbacks |
| Specialist skills needed | Graphics, concurrency, web performance | JS/TS plus the library’s API | TypeScript, REST API consumption |
| Support | None | Community / GitHub issues | Vendor SLA + dedicated team |
| Fits best | Unique requirements, in-house team | Team with engineering time + backend | Shipping fast with a small integration |
Most teams underestimate the long tail of work in the DIY path. Rendering 20,000 seats at 60fps on a mid-range Android phone is not a week of work – it is an ongoing performance-engineering commitment. Availability sync across concurrent buyers, sensible lock TTLs, and recovering from a stale frontend state each take weeks to get right. Open source moves you past the “pan, zoom, and draw shapes” work but leaves the backend entirely on your plate. If your core product is ticketing, it is usually cheaper to integrate a commercial SDK and focus your engineers on the parts of the platform customers can see.
If you do go the DIY route, start with Canvas (not WebGL) and only move to WebGL if your seat count or visual polish justifies it. WebGL is powerful but the development cost is significantly higher – you are writing shaders, managing GPU buffers, and dealing with context-loss edge cases that Canvas abstracts away. For more on that tradeoff, see Seating plans. How do we render?.
Whichever path you take, a few pitfalls bite almost every team that ships a JavaScript seating chart for the first time:
If you want to see a working JavaScript seating chart right now, open the Renderer Playground – no signup required. When you are ready to integrate, the Renderer SDK Getting Started guide walks through installing @seatmap.pro/renderer, wiring up publicKey and eventId, and deploying to production.
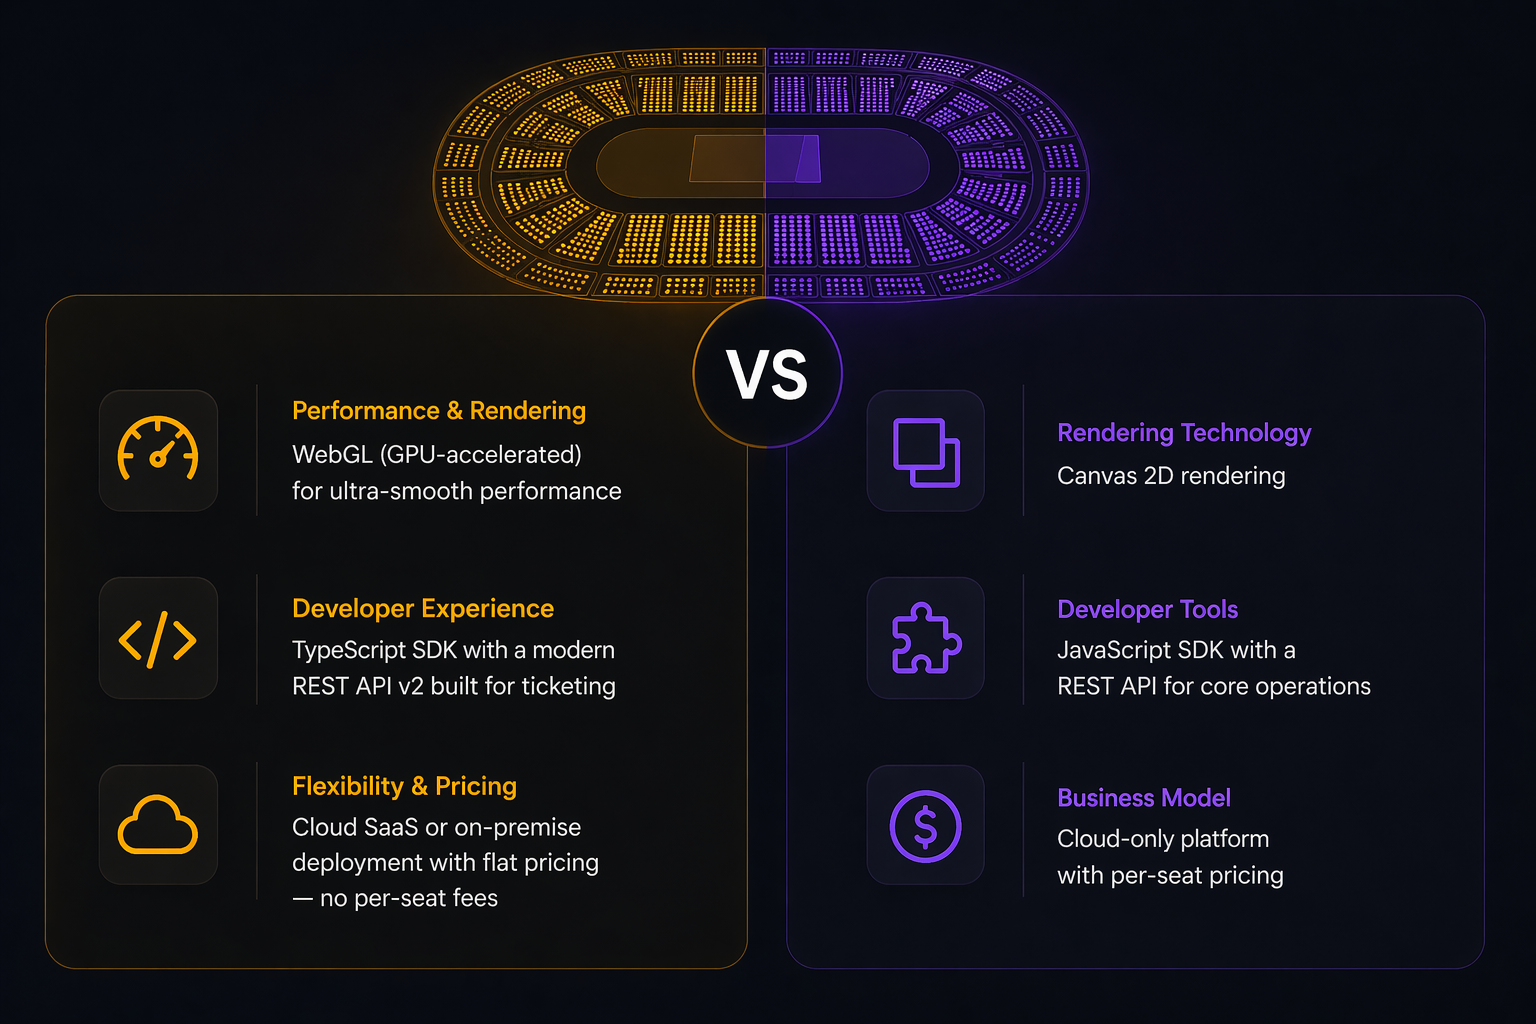
A complete end-to-end example including event creation, the renderer, and checkout lives in the Getting Started guide. If you prefer to evaluate the platform against alternatives first, the Seatmap Pro vs Seats.io comparison covers rendering tech, pricing, deployment, and SDK design head-to-head.
Or if you would rather talk to us about your integration before writing any code, request a demo and we will walk through the workflow against a venue close to yours.
A non-technical guide to adding an interactive seating plan to your event website -- iframe vs SDK, what your dev team needs, timeline, and vendor questions.
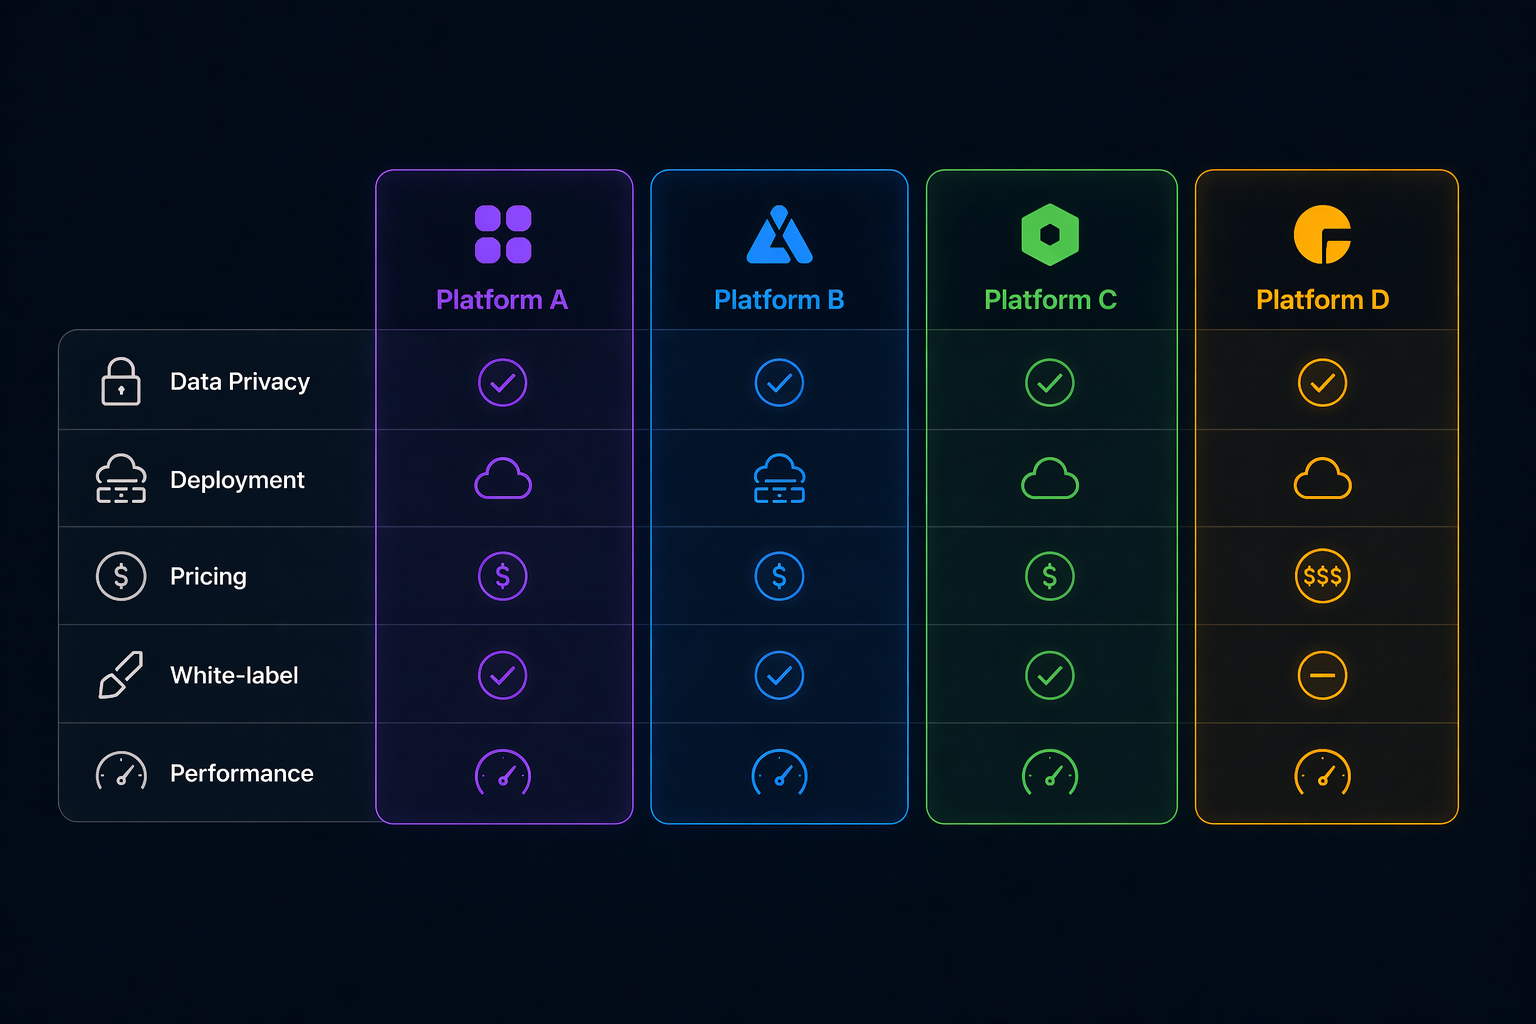
Looking for Seats.io alternatives? Compare 4 seating chart platforms by rendering, pricing, deployment, and API. Find the best fit for your ticketing system.
Compare Seatmap Pro and Seats.io head-to-head: rendering tech, pricing, deployment, API, and SDK. Find the right seating chart platform for your ticketing system.